
Thank you for your comments and support on my last post--I really enjoyed reading them, and how we support each other. Thank you!
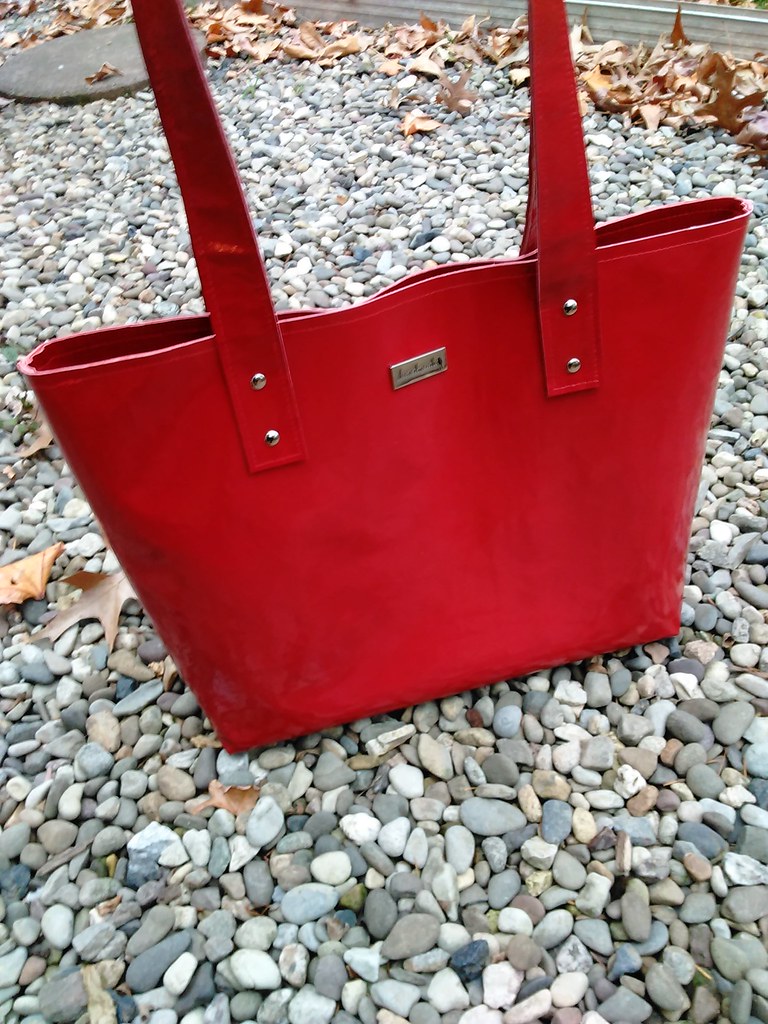
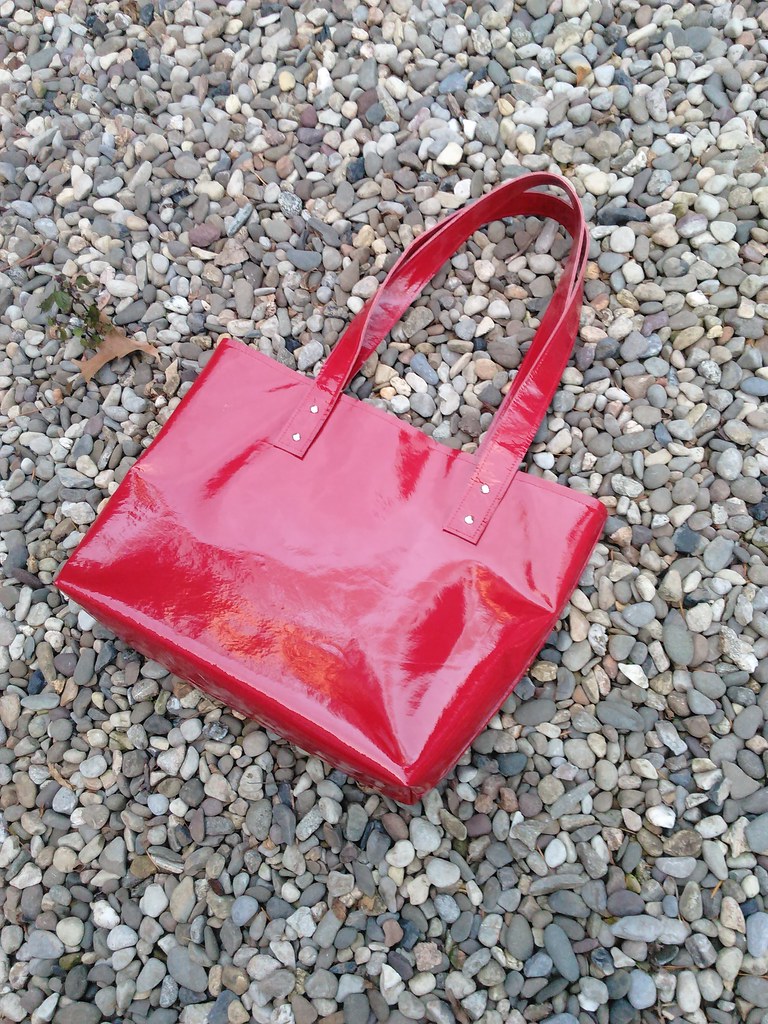
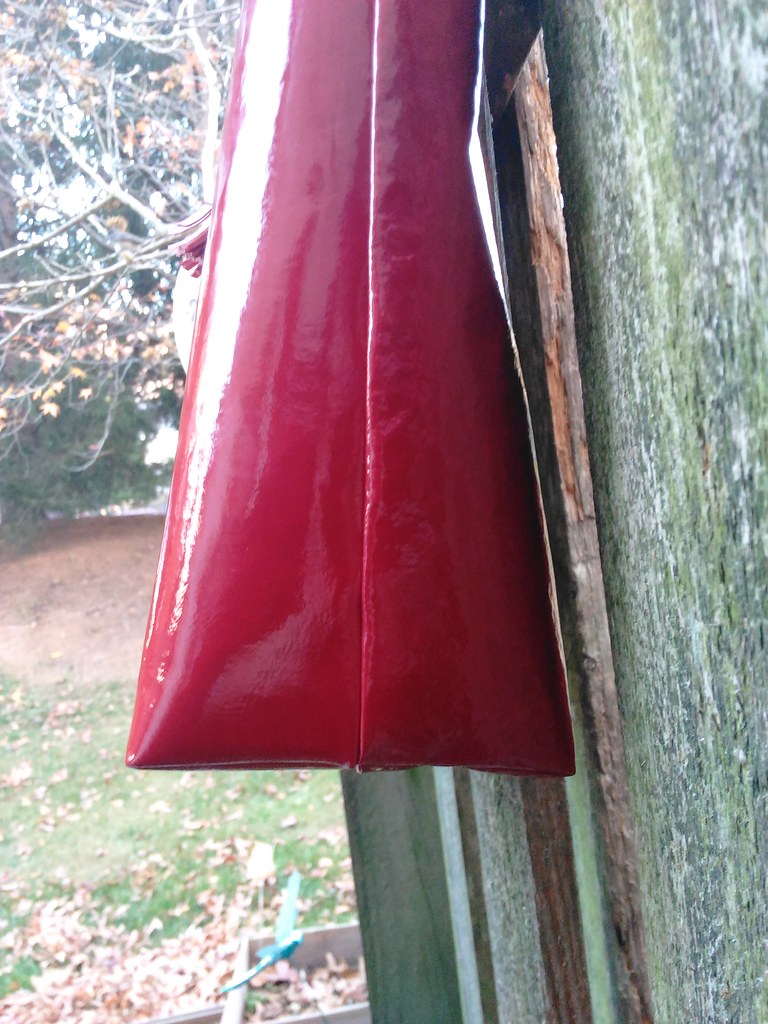
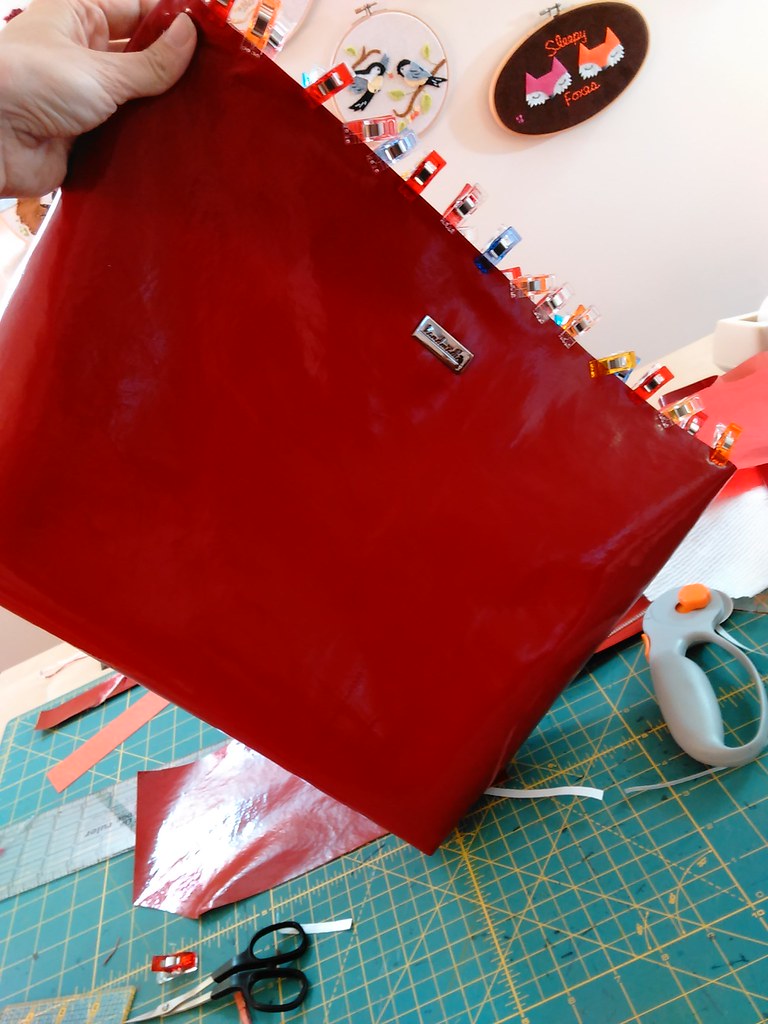
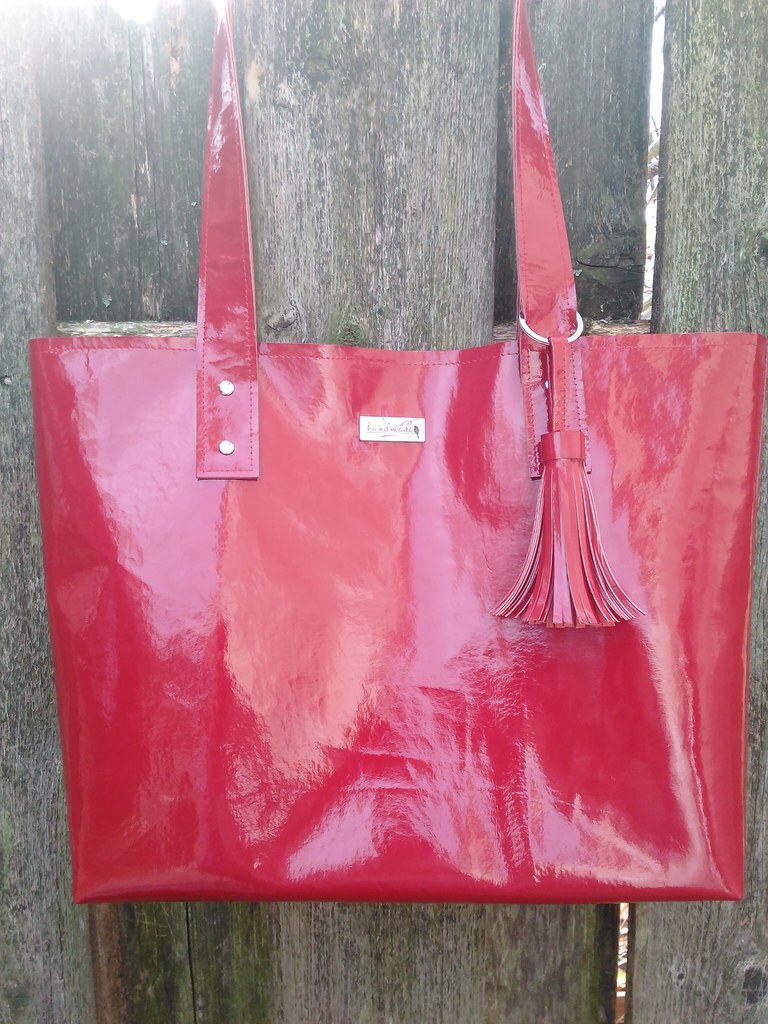
Front, no tassel
Back
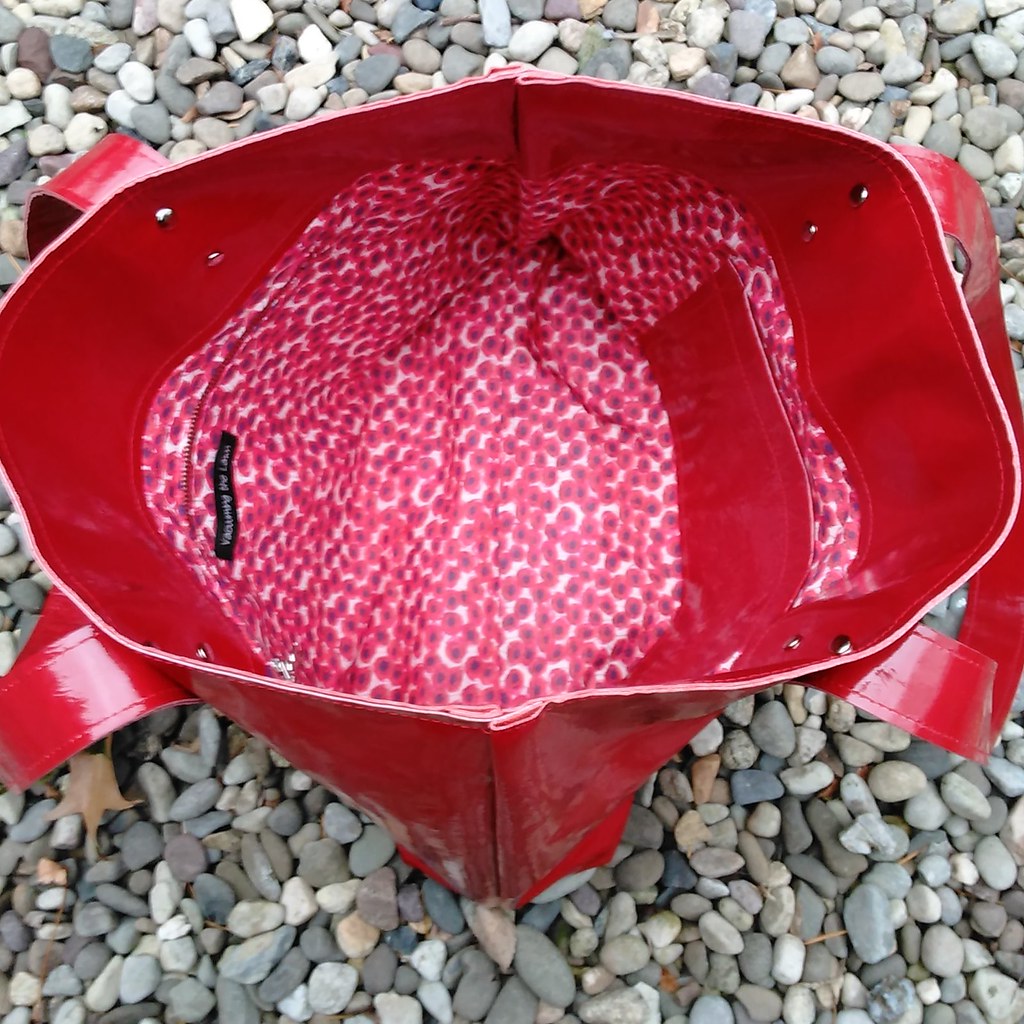
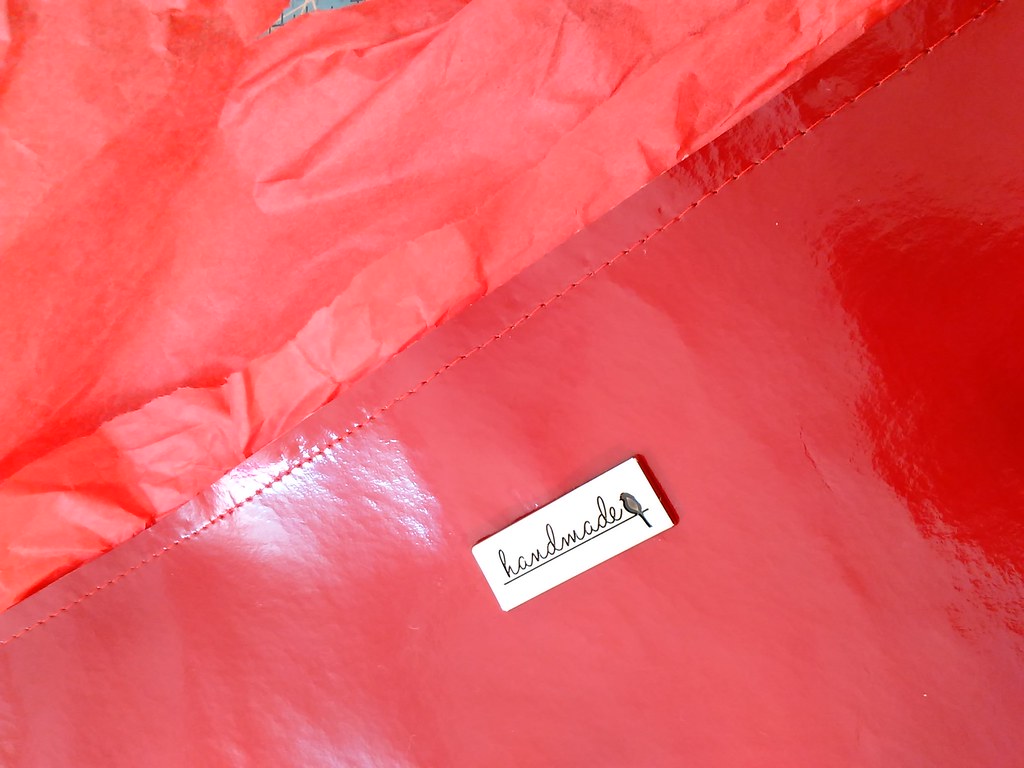
Inside
Dad and I didn't celebrate Thanksgiving until today, which meant that Thanksgiving Day and Black Friday were total play days for me! And of course "play" means "sewing"!
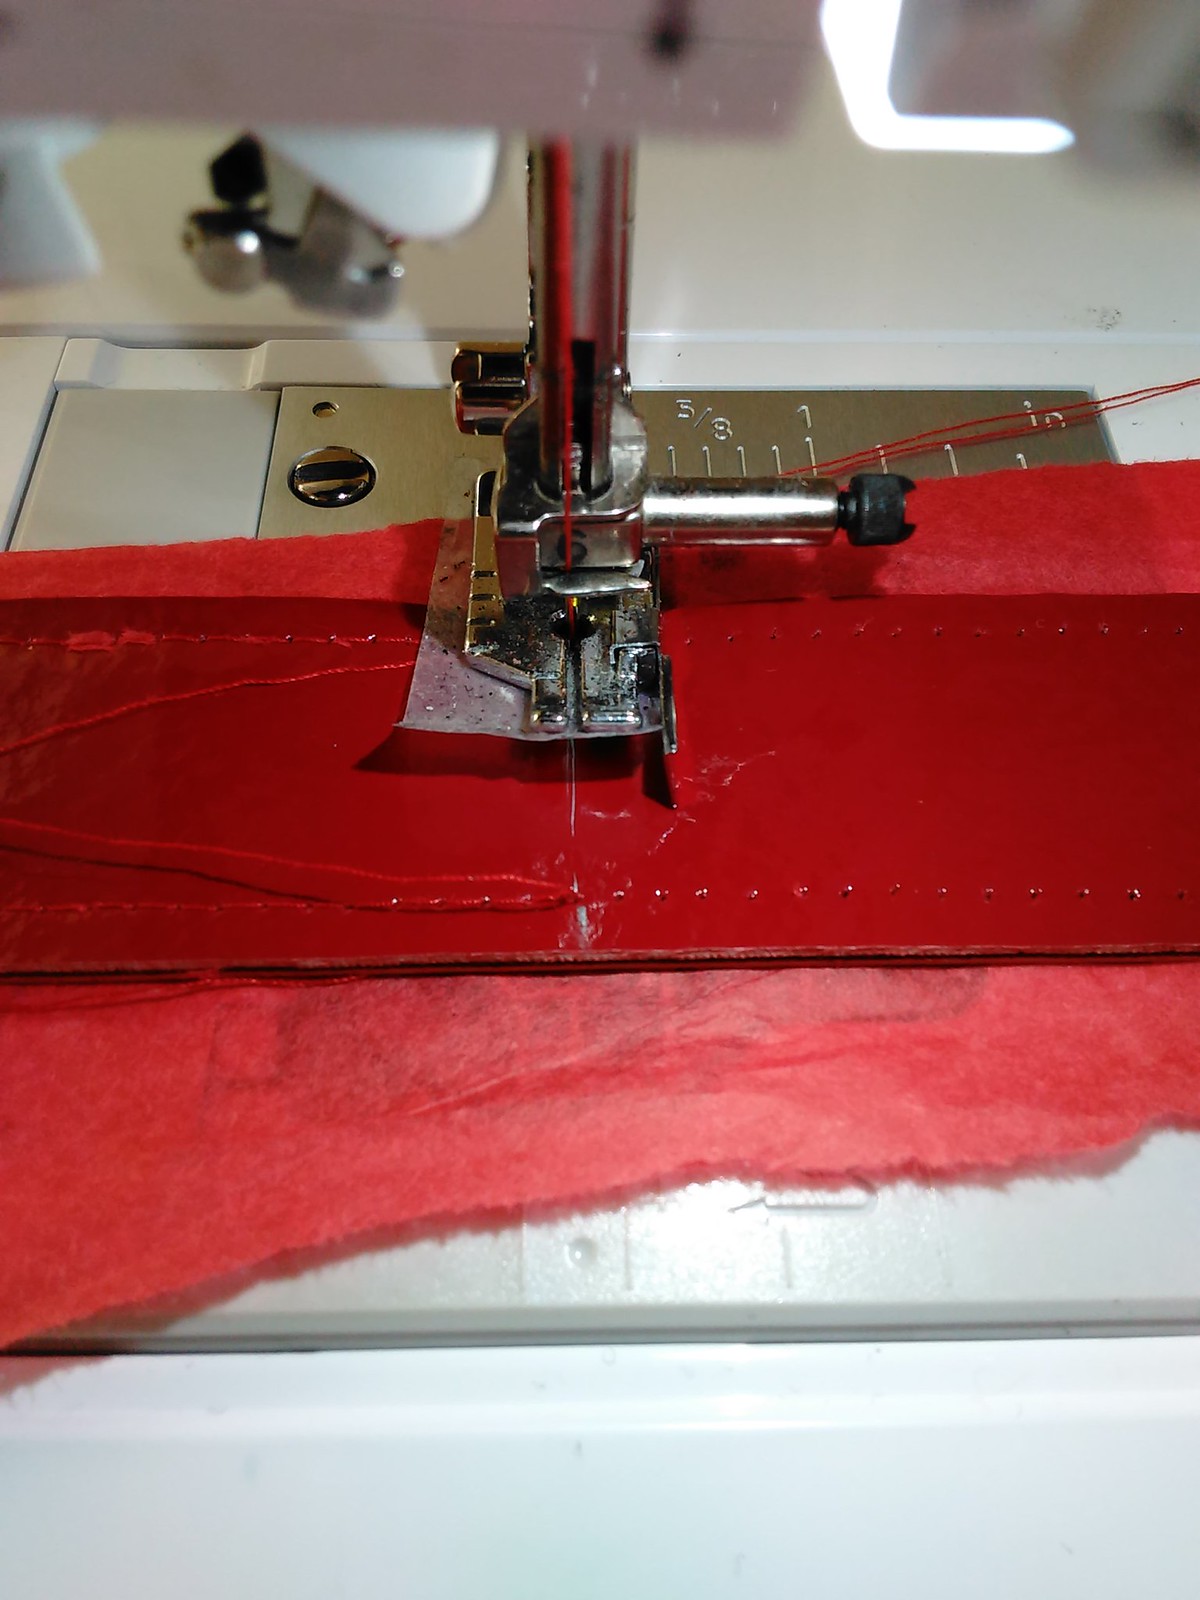
I bought this red patent pig leather from Fishman's Fabrics during PR weekend in Chicago this year. When I bought the leather, I had not sewn with leather before except for a hands-on workshop I took with Kenneth King at the ASE in 2014. I found those notes this summer, and did some more research into working with leather, which resulted in the aqua lamb leather bag I made at the end of July--copious details are in this blog post. I have used that bag a lot, but I had not interfaced the handles and they have stretched significantly. So when I made the Blue Calla Boronia bag for the PR contest, I fused interfacing to the handles. Those handles did stretch just slightly, like 1/8", but you know I notice those things! So this time I interfaced the handles with buckram, that I bought at Kashi's. I'm thinking they are not going to stretch at all but I will report back.
My main leather advice (after making 2 full-leather bags and one partial leather) is:
- Use a new rotary blade and made as continuous a cut as you can (quilting rulers really help)
- Use a fresh leather needle (size 18 for this project) for the main bag sewing and yet another fresh leather needle when it's time to stitch the topstitching
- Use a teflon foot and put tissue paper that matches the leather between the leather and the machine bed to stop the leather from sticking to the machine.
Planning it out

Planning out the rough positioning of the front /back of bag, the upper interior lining and the straps....ballpark idea here which wasn't the final positioning as I wound up initially cutting the handles extra long)
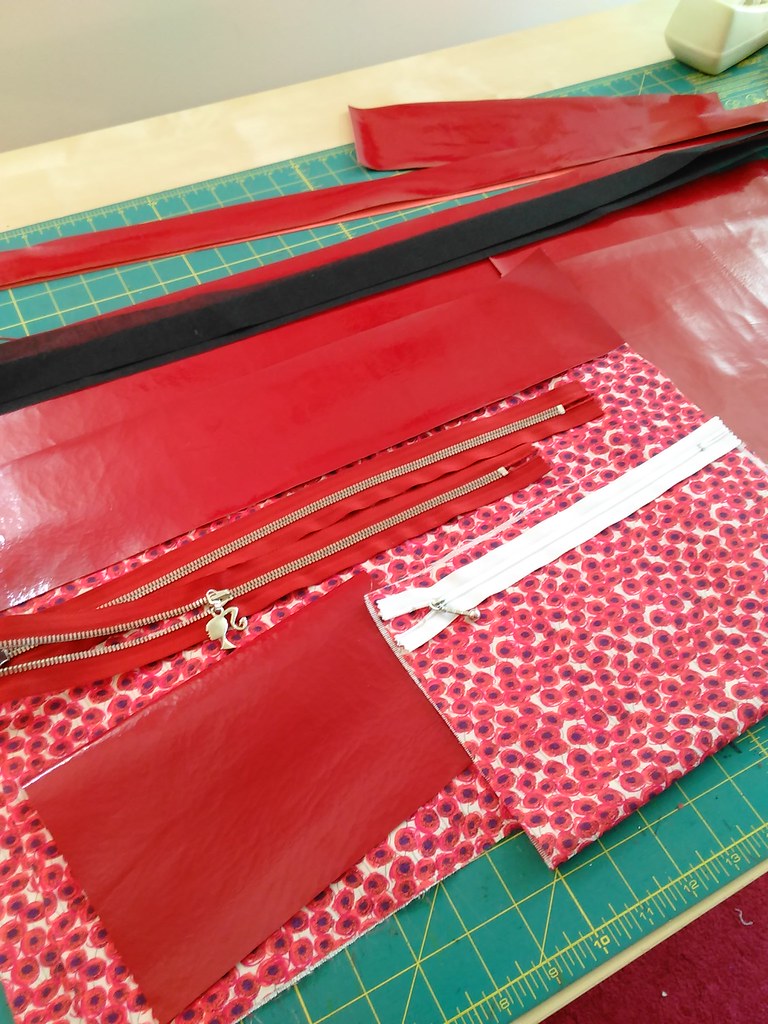
Everything cut out and lining interfaced. At this point I wasn't sure if i was going to use the 9" white zipper for the interior zipper pocket or cut down the 30" red one....
The exterior
I wound up using a cutting mat as my template--which was 18.5" long x 14.75" tall. I used a 1/2" seam allowance. This time I boxed the corners so that the result is a 4" box.
The lining
The lining is a Liberty of London Xante Sunbeam cotton voile that I bought from Mood specifically to coordinate with this leather. I interfaced it with interfacing from Fashion Sewing Supply to beef it up a bit. I only had the light proweft in stash but would have preferred to use the medium.
Patch pocket
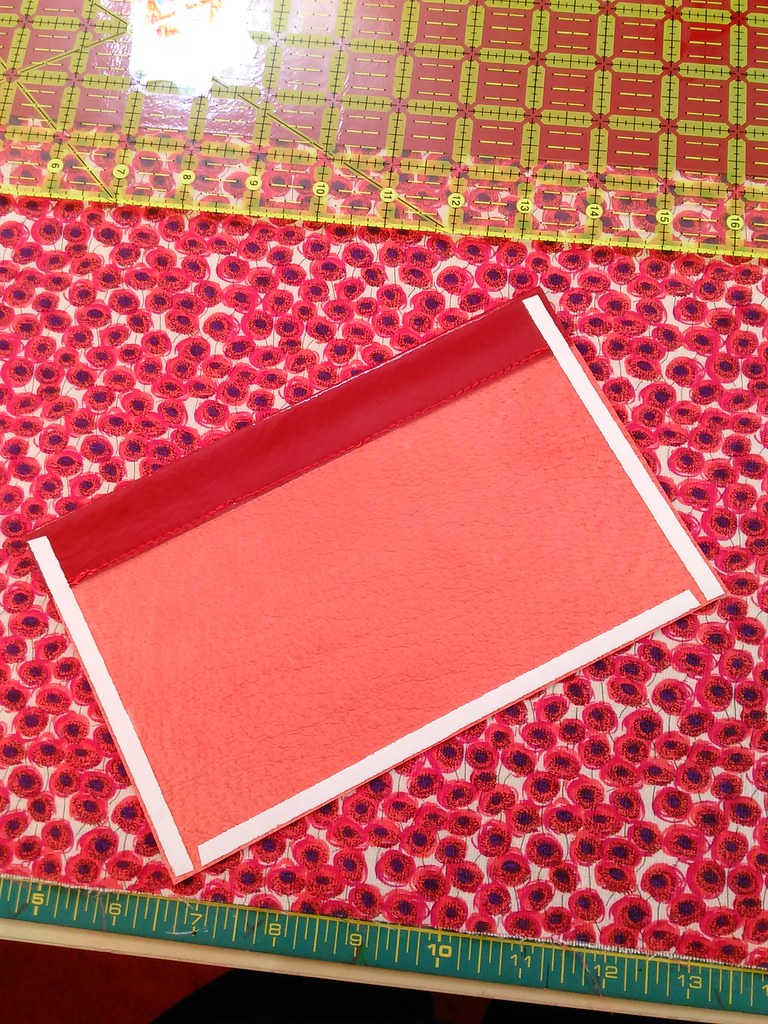
I cut the pocket 8" long by 6" high, then folded over the top 1" and stitched down.
Then I applied Wonder Tape around the three edges, peeled it off and centered it on the lining.
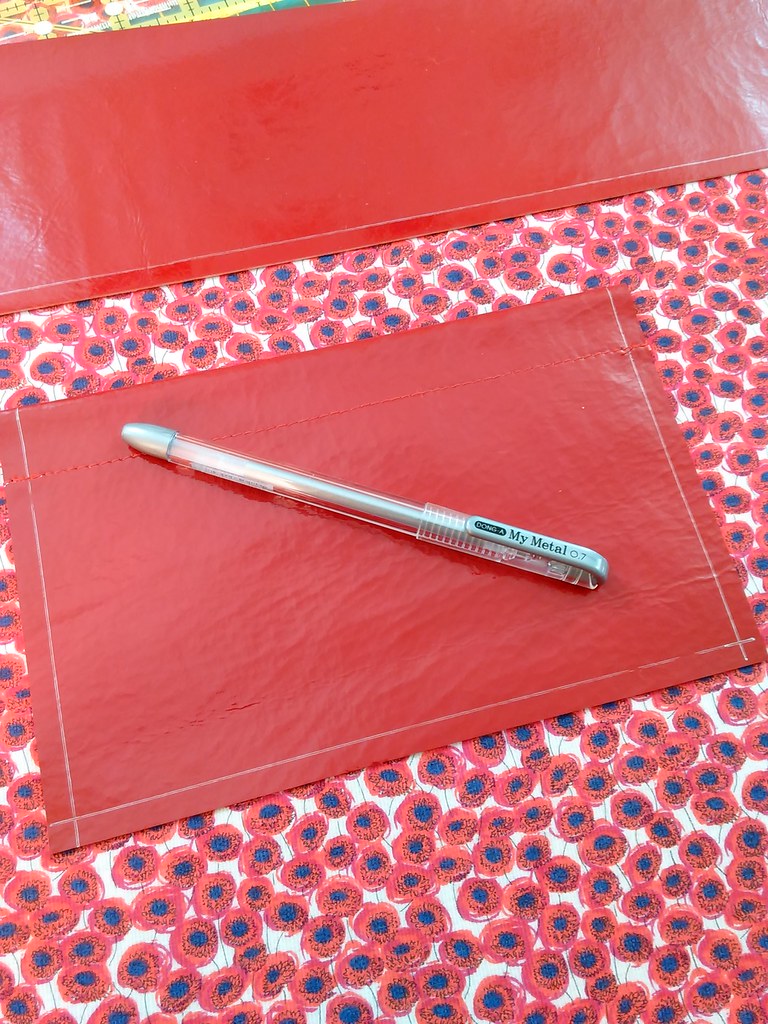
I used this silver pen (purchased at SIL Thread in NYC) that writes on this leather to draw the stitching line and mark the pivots for the corners. This pen happens to wipe off the patent leather with a wet cloth, so it is easy to remove the markings afterward--but always test first!
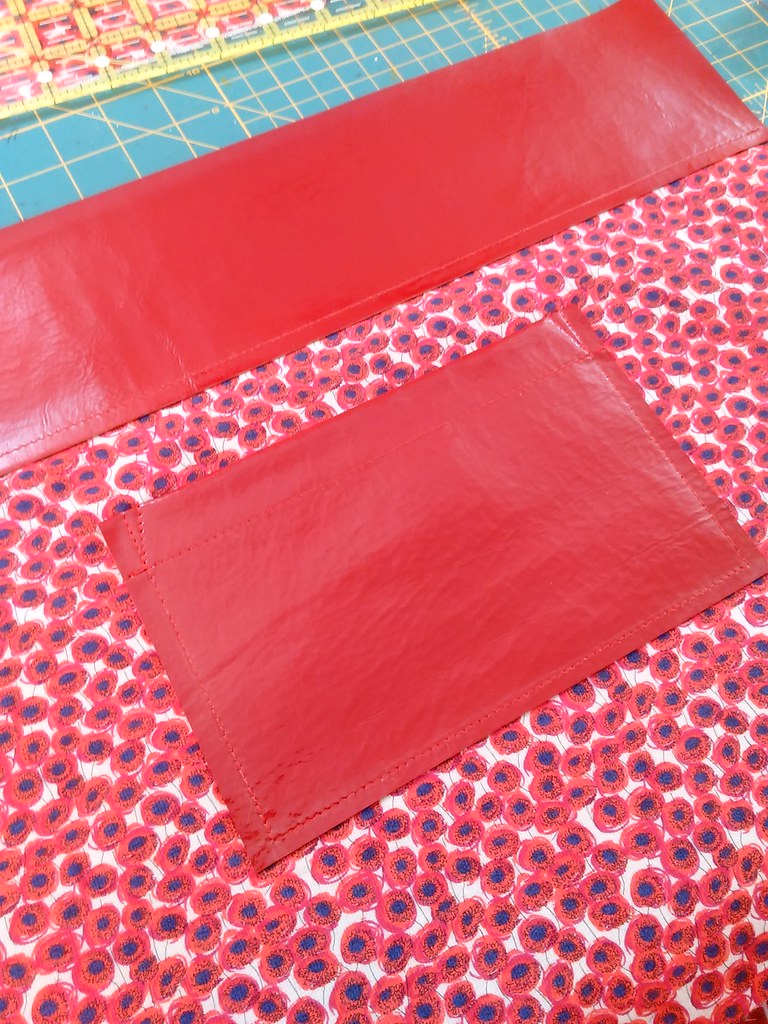
I stitched a triangle at the upper right and left corners for security.
The zipper pocket
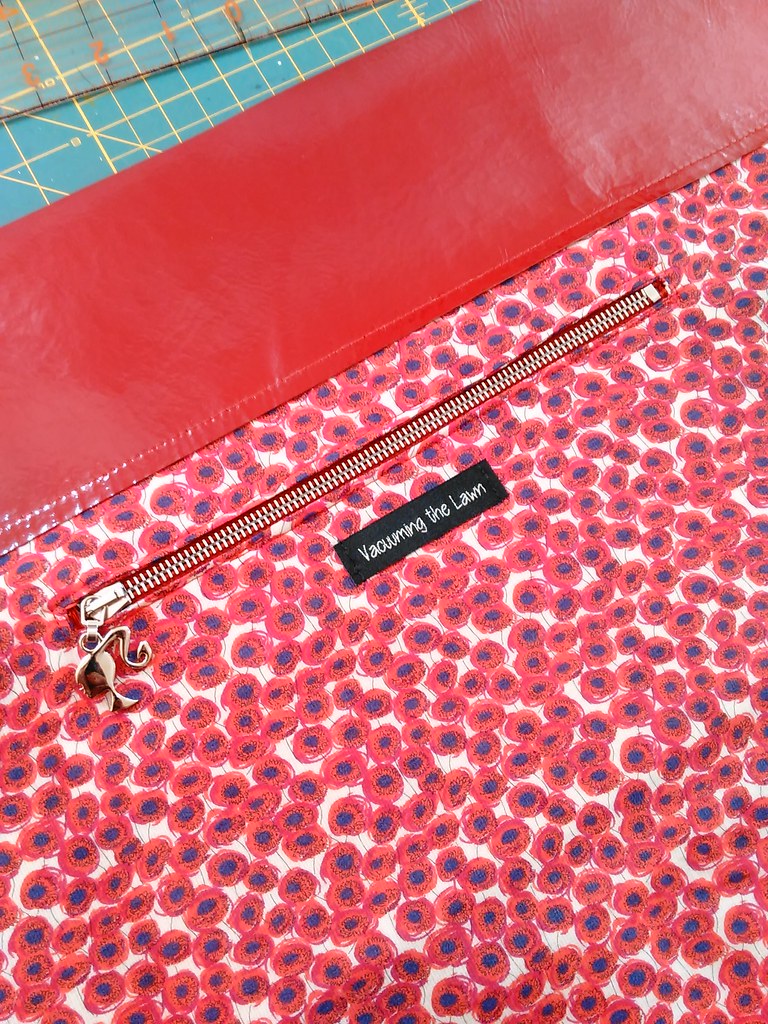
And I added an interior zipper pocket using my favorite tutorial.
I had a double-pull "girl with the ponytail" 30" zipper custom made at Botani, because I was thinking I was going to use this leather to make a Boronia Bag. But after making the Boronia bag, I doubted that the patent pig leather would survive the "bag birthing" process. So, I shortened the zipper down to 9" in the most wacky way possible, sigh. It is not pretty but it's all hidden by the lining and is functional. And now I have ~19" of the other side of the zipper to use for another project.
Bag Bling and Peltex
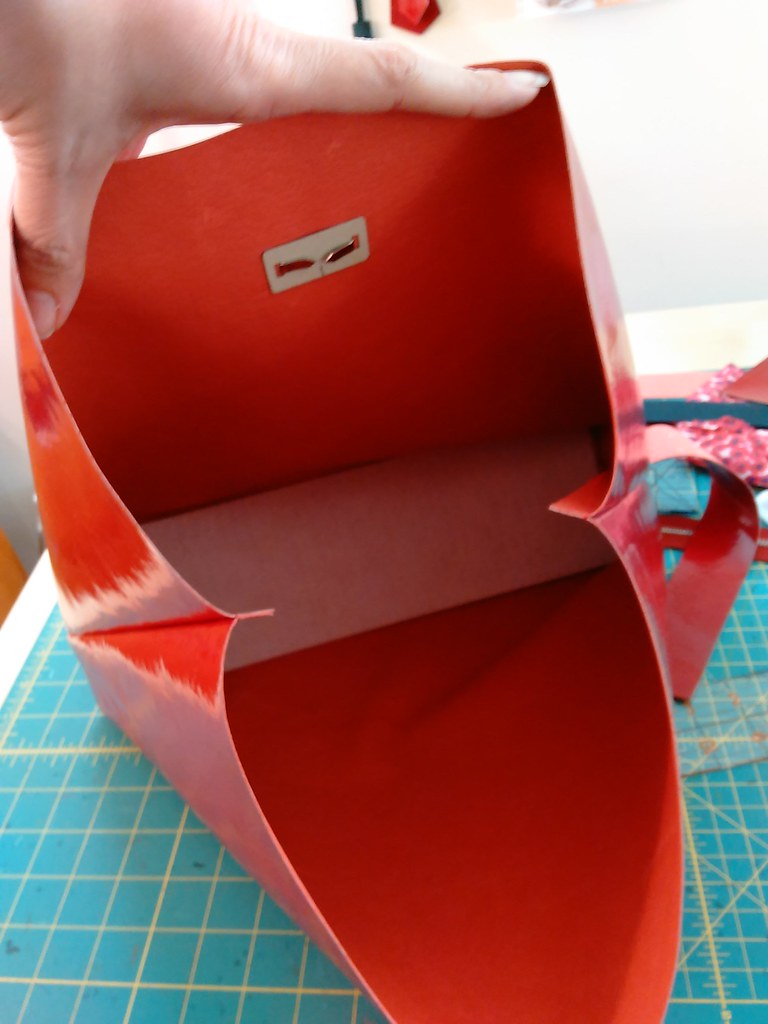
I applied the bag bling (here you can see what it looks like from the inside--it's like a big clasp) and cut a piece of peltex to fit in the bottom of the bag.
bag bling
Attaching the lining to the exterior
I used wonder tape to hold the interior to the exterior....along with a lot of wonder clips
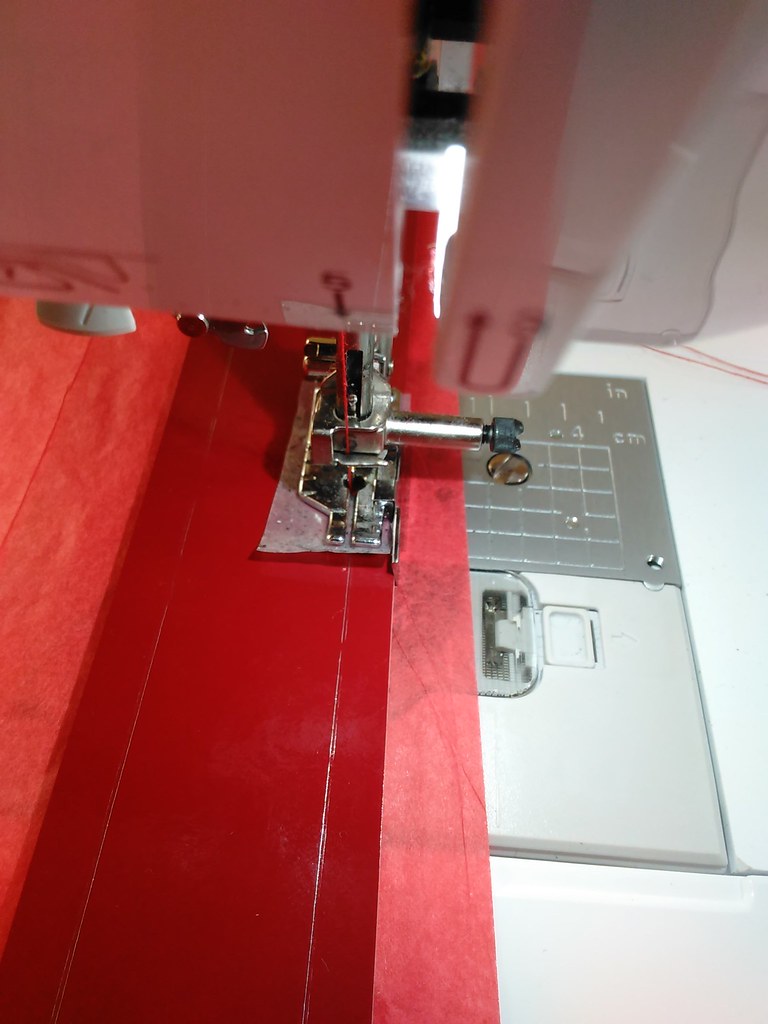
I topstitched along the top of the bag, and used my 1/4" foot with tape on the bottom to prevent it from sticking to the leather, and with red tissue paper underneath to keep the leather from sticking to the bed of the sewing machine. This was at 3.5, 3.5, 4.8. Honestly I didn't like my first attempt and cut it off then tried again.
The handles
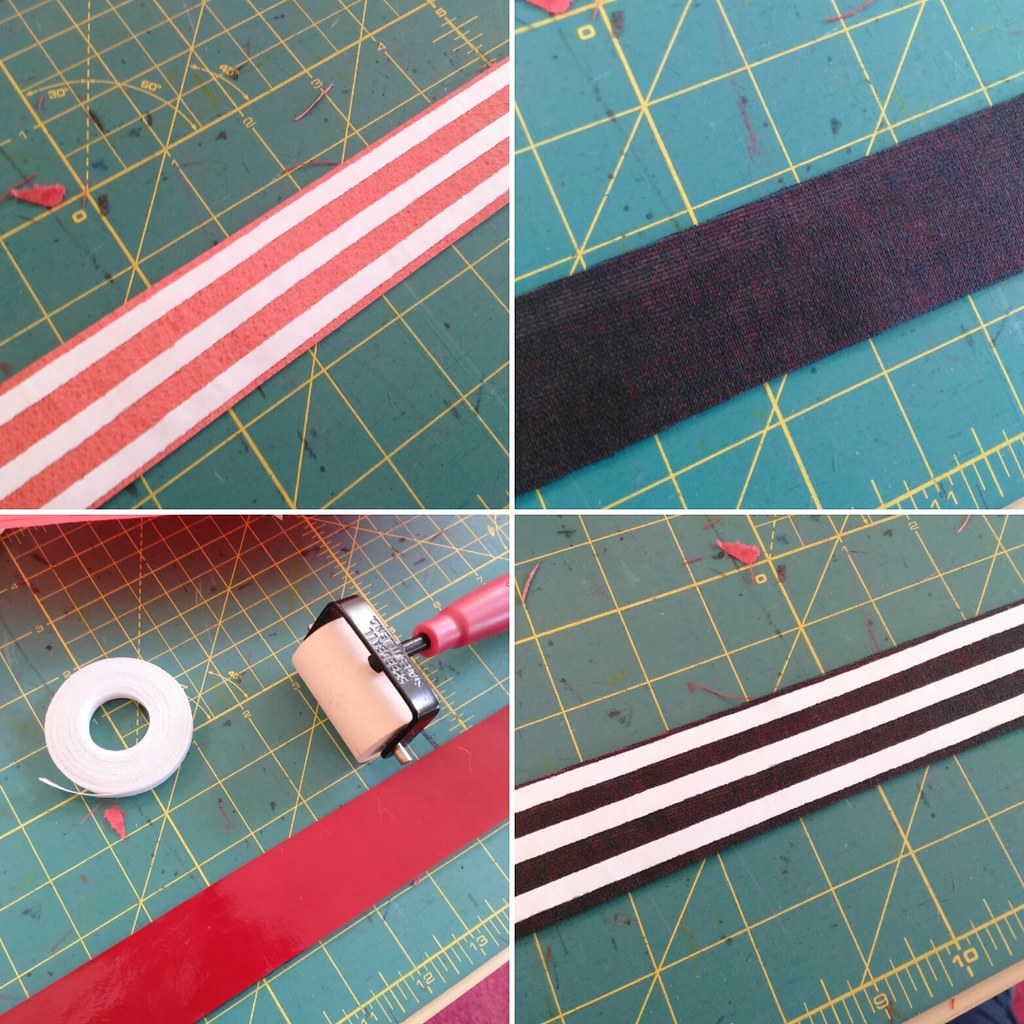
Above is how I made the handles, clockwise from upper left:
1) applied three rows of Wonder Tape (WT)
2) removed the adhesive backing and layered on the buckram
3) applied three rows of WT
4) removed the adhesive backing and layered on the other strap
In between each step I used the brayer (that rubber roller thing ) to flatten out the WT and help it adhere. It also gets any "bubbles" out.
You can see the thread tails on the left side of the pic....and where I *carefully* unpicked the stitching to shorten them down. You can also see on the right side of the pic how holes made in leather always stay!!!
The handles were originally 34" long--i made them extra long with the idea that they would extend way down onto the bag yet still have 27" of clearance. I wound up shortening them down to 30" by carefully removing the stitching I had already stitched, moving them out of the way, then used my machine, starting and ending with long thread tails and with the needle in the previously made hole, stitched across (to make it look like I had stitched, pivoted, stitched across, pivoted, stitched back up) using long thread tails on each end and stitching across with the machine, pulling the tails to the back and knotting . They were topstitched using my 1/4" foot at 3.5, 4.0, 6.0. I really had to crank up the tension to get the stitching to look good on the front and back--but somehow they looked the best fro the back!. The thread is regular Coats and Clark thread, color #2250.
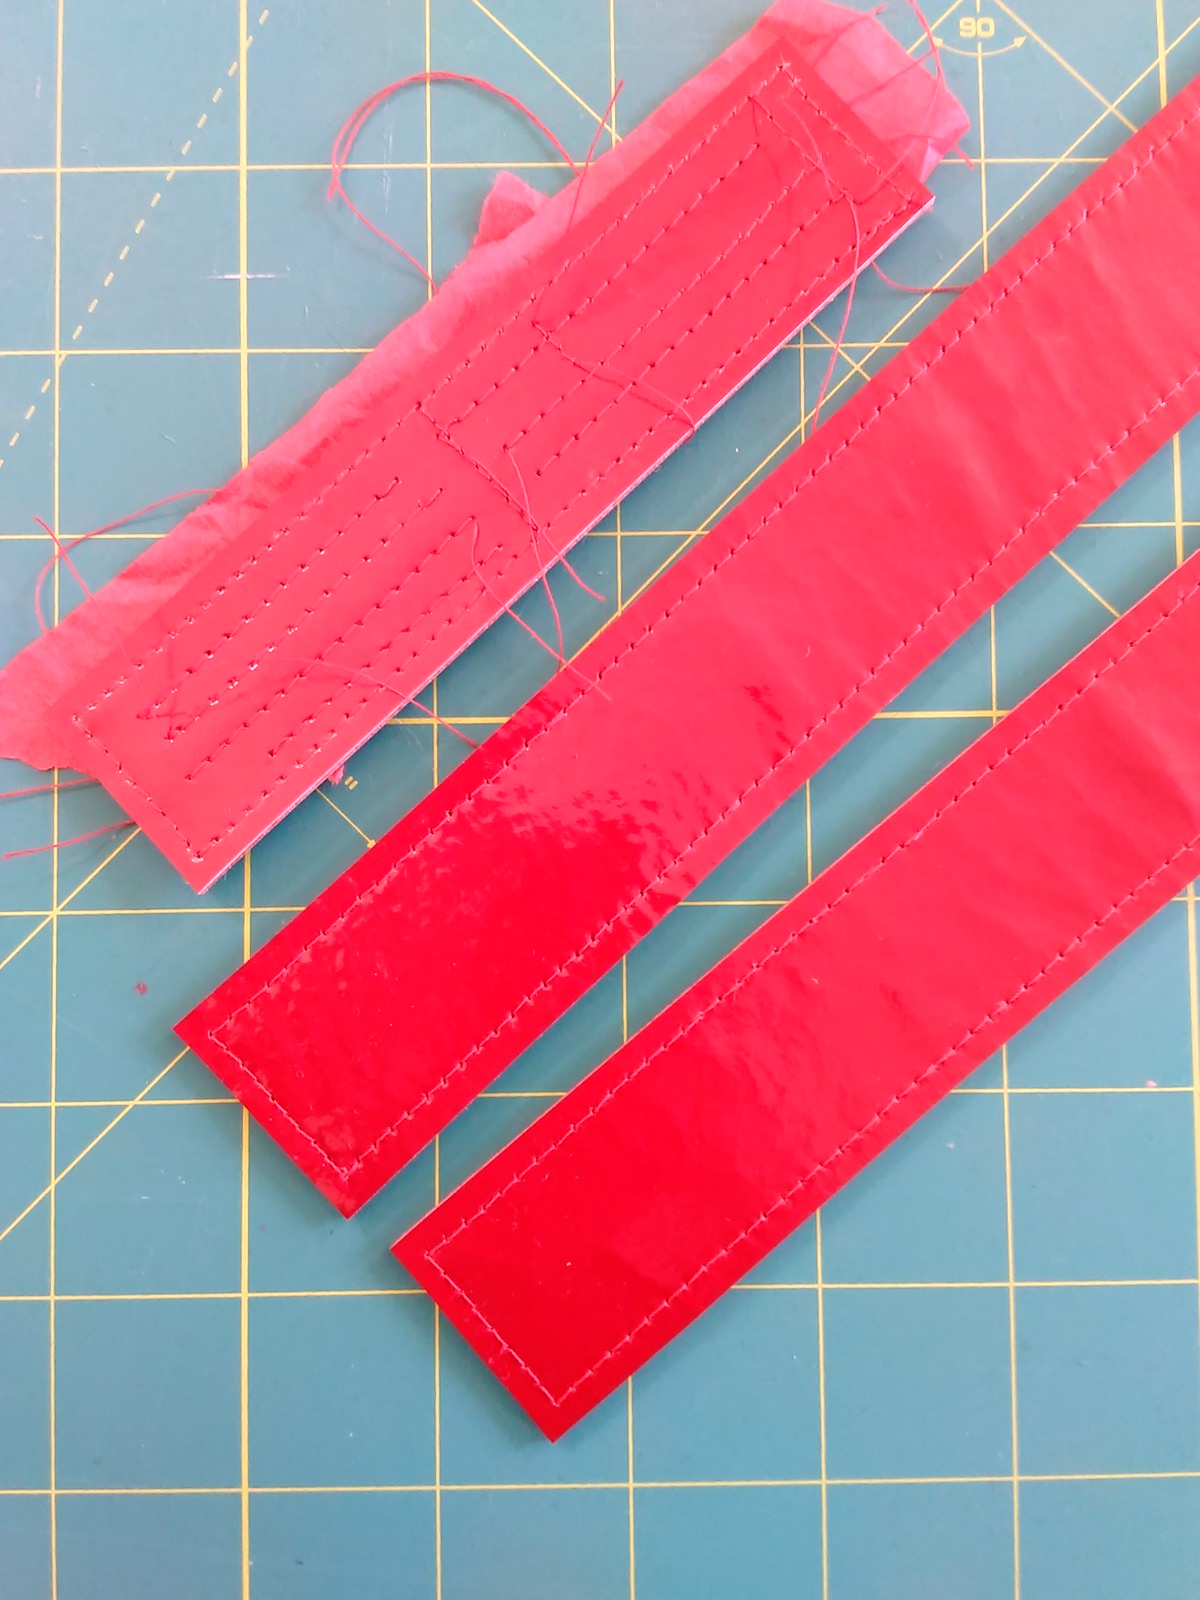
Making a sample (at the top--used red tissue paper between the handle and the machine bed because the patent leather was sticking to the machine bed otherwise) and the two final handles....
I know I said that last time (with the aqua bag) I wouldn't make the handles as wide, but I did! I cut them 1.5" long and after stitching them, I cut them down so that the stitching is only 1/8" away from the edge. this gets them down to about 1.25" but really I should start with 1.25 and then cut them down to 1".
Instead of sewing the handles into the bag like I did with the aqua bag, I decided to use rivets.
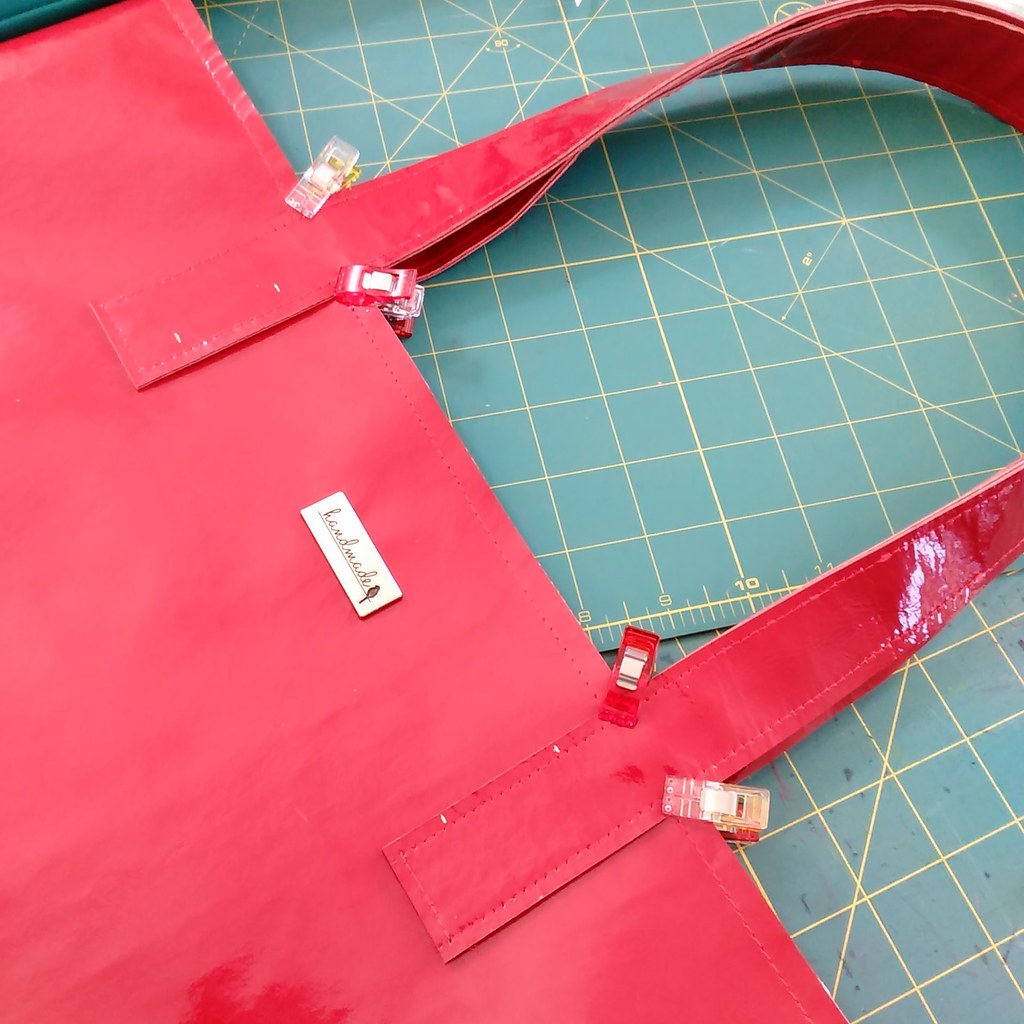
Used my silver pen to initially mark the position--too bad i didn't take another pic, I really had a lot of lines to mark the locations!
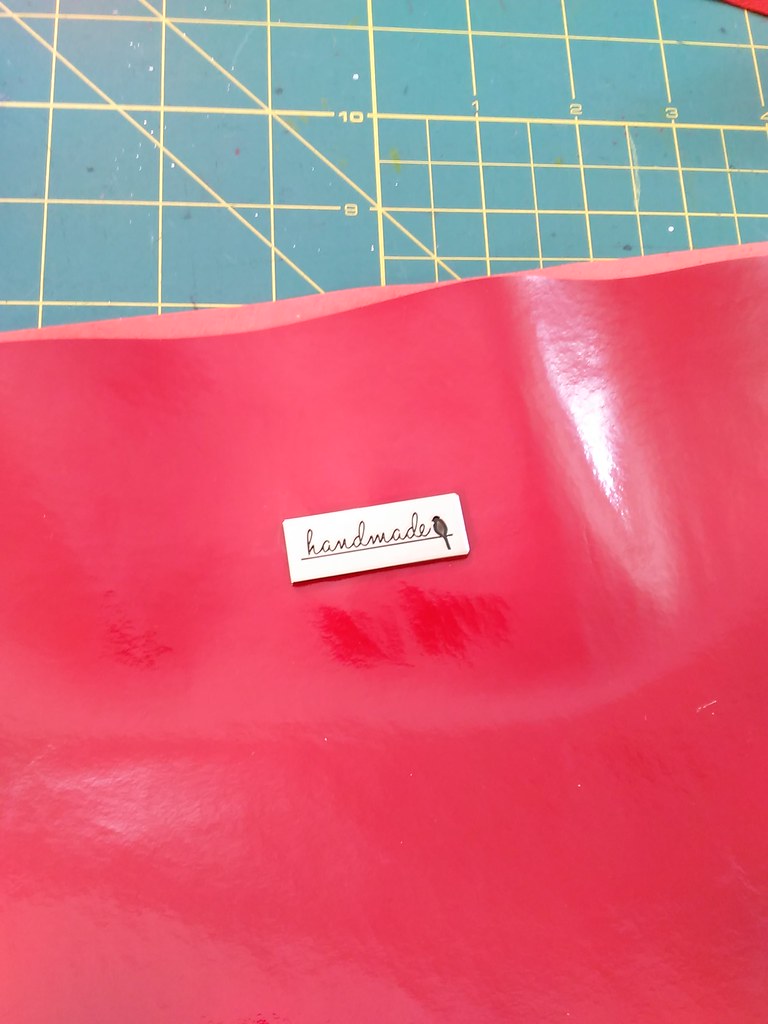
I attached the handles to the bag using the small sized double capped rivets from Emmalinebags.com. Since they are double capped, they are pretty on the inside, too. The "handmade (with a bird)" bag bling is also from Emmaline Bags.
Boom! Rivets!
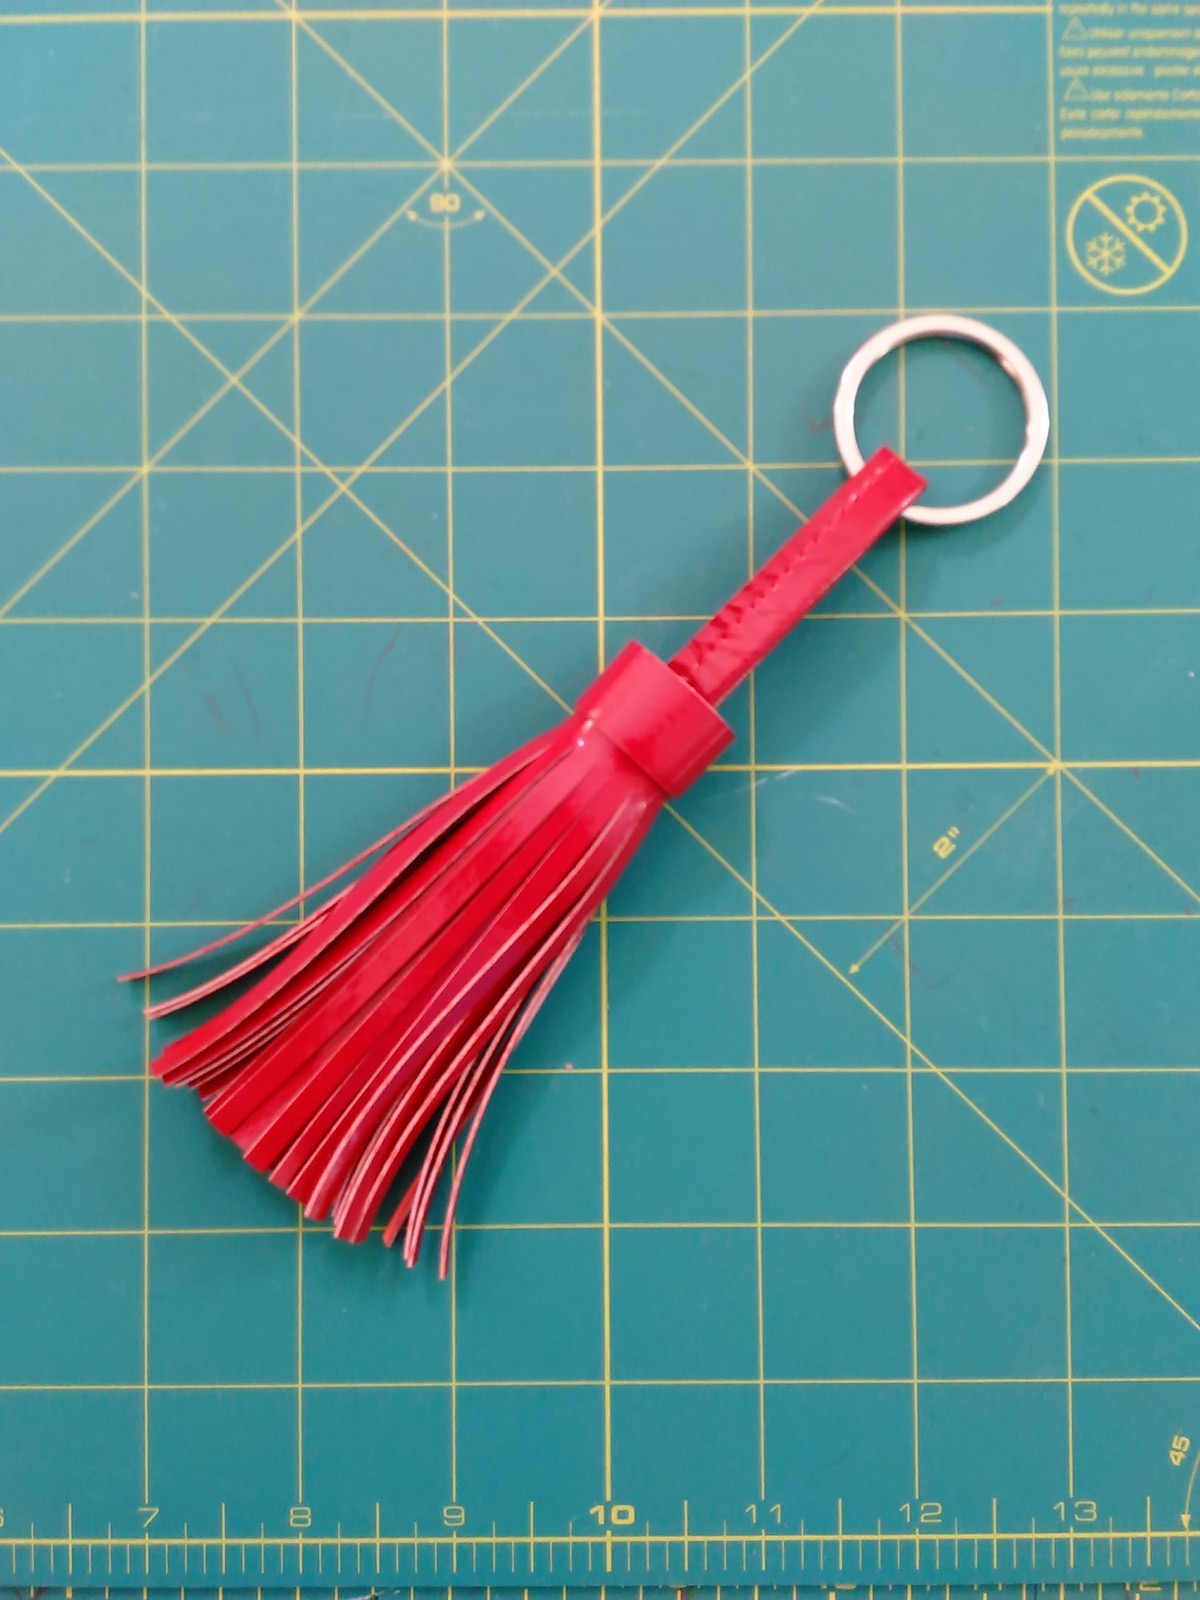
The tassel
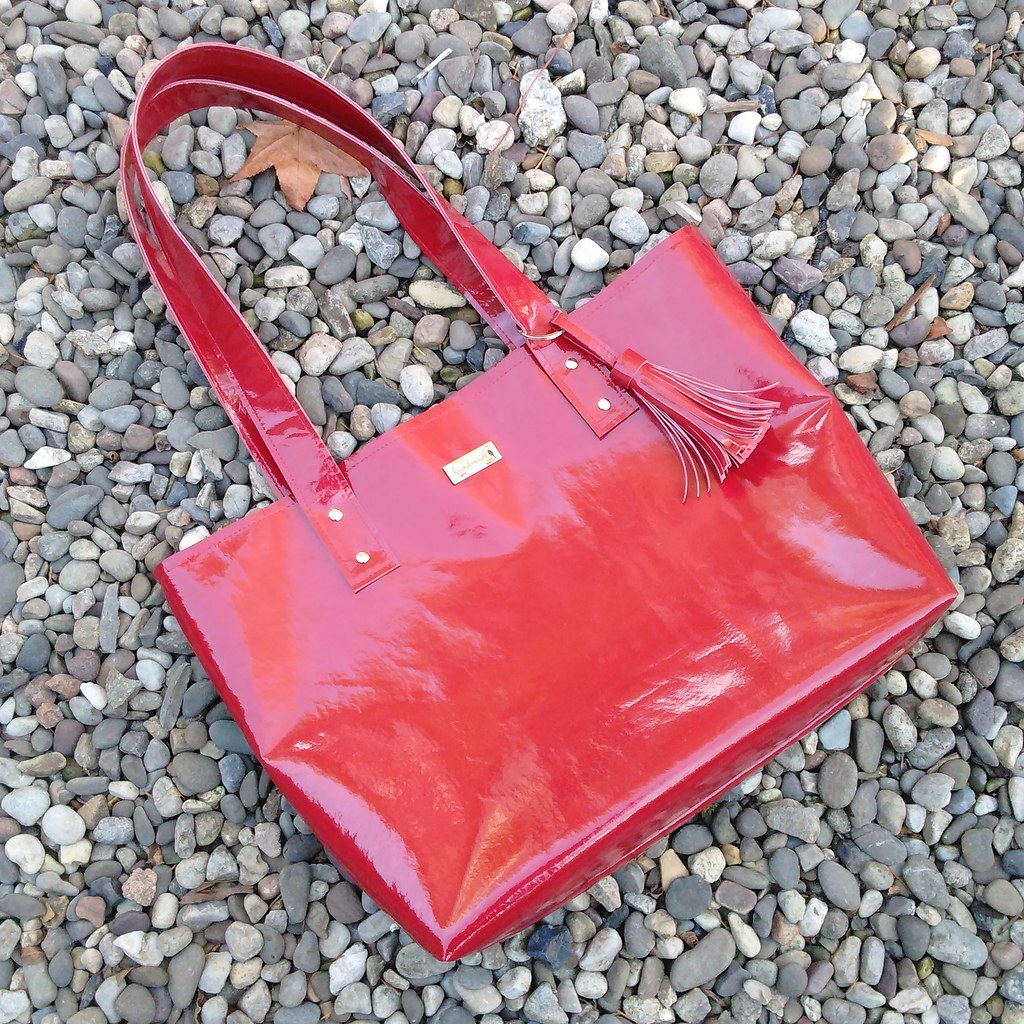
I made a tassel using the instructions from Laura Bennett's Handmade Chic book, but made cut the original rectangle 14" x 4" to result in a longer, wider tassel. However, I'm not sure the bag really needs the tassel, as the tassel obscures the rivets when the bag is upright.
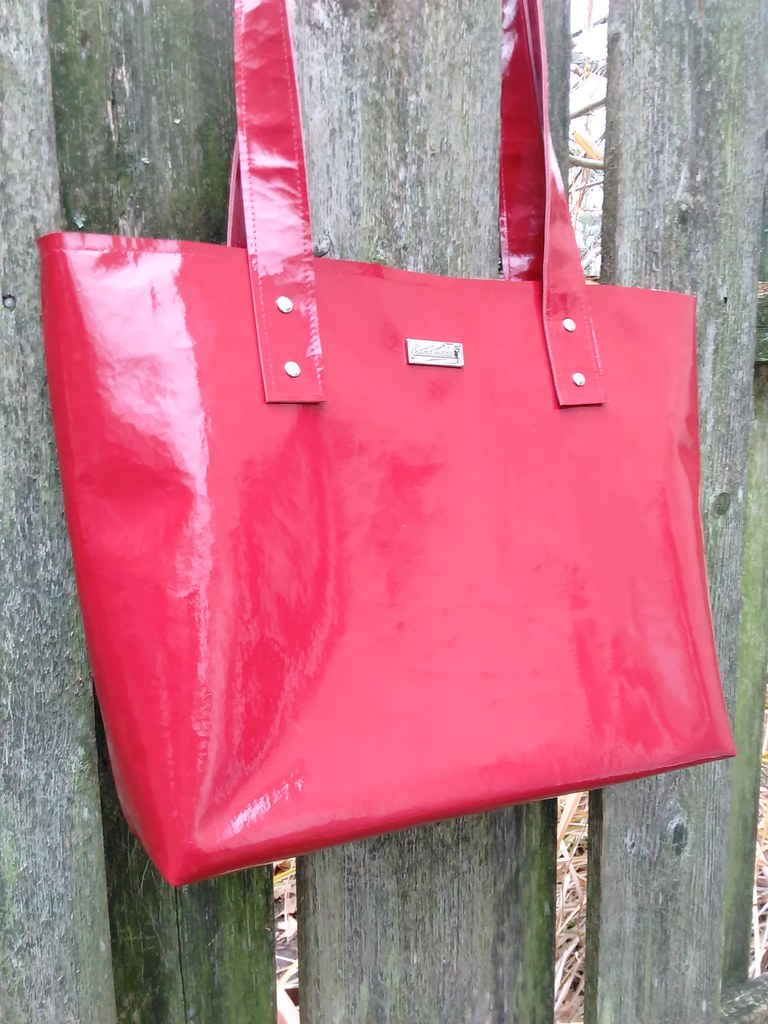
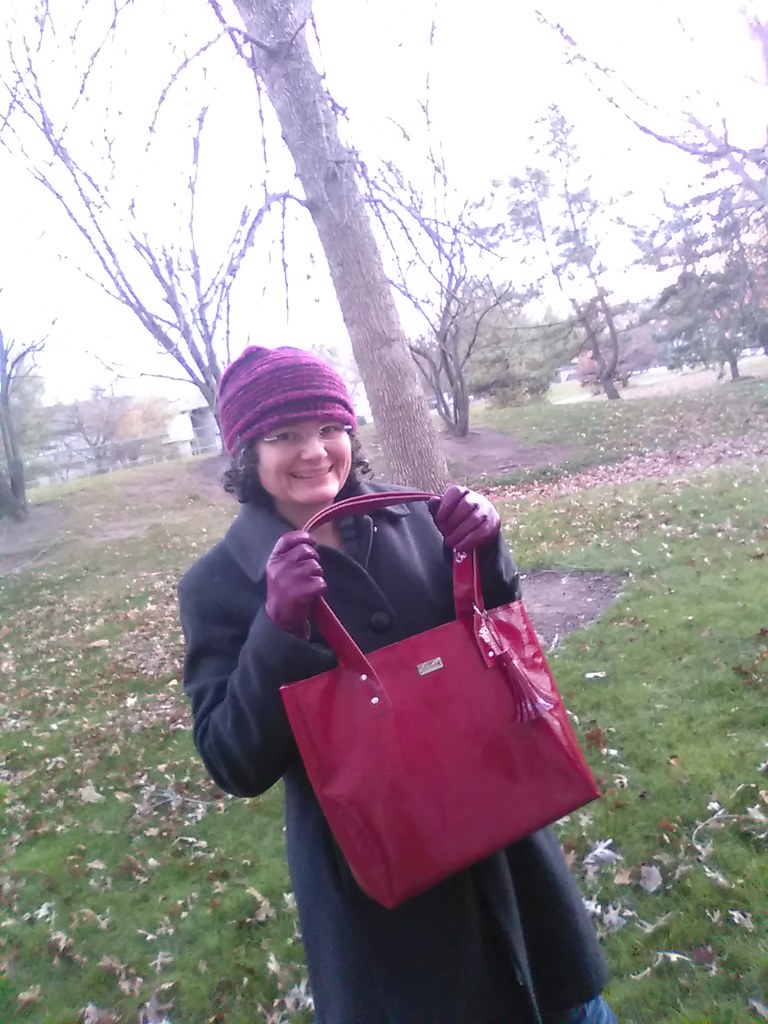
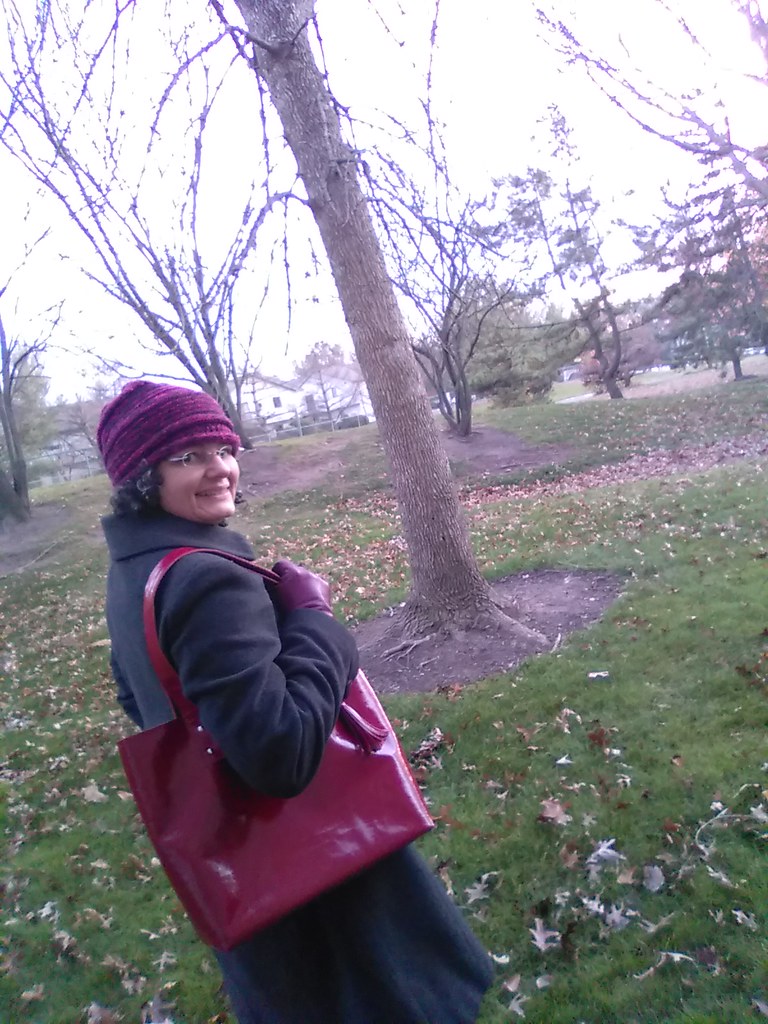
The completed bag!
So I kind of want to make a leather backpack! Not now, but early next year. Well, probably not now. Stay tuned!!
Be well!
Bye!
I made a tassel using the instructions from Laura Bennett's Handmade Chic book, but made cut the original rectangle 14" x 4" to result in a longer, wider tassel. However, I'm not sure the bag really needs the tassel, as the tassel obscures the rivets when the bag is upright.
The completed bag!
So I kind of want to make a leather backpack! Not now, but early next year. Well, probably not now. Stay tuned!!
Be well!
Bye!
Dang! Yet another gorgeous bag! I really enjoy and appreciate your detailed process posts. I have picked up some very useful technique tips in them...many thanks for the time and effort you put in to them.
ReplyDeleteThank you for letting me know, careymoonbeam! I sometimes think that I write way too much, so I am happy to know that the posts are useful!
DeleteI love this! The tassel needs to stay, even if it does cover some of the rivets. Well done Kyle
ReplyDeleteThanks for the love Mary! The tassel is staying!
DeleteThat is GORGEOUS Kyle. Love your back drop.
ReplyDeleteThanks Faye! I've lived here for 12 years and this year is the first time I'm really taking advantage of the stones in my backyard. I've always thought of it as the gravel pit but it's actually much nicer than that!
DeleteWhat a gorgeous red bag! I am always impressed with your bag construction, but that tassel...wow!! :)
ReplyDeleteThank you Vanessa! The tassel is the easiest part!!!! Very straightforward!
DeleteSWOON! LOVE IT! I love red patent leather and your bag is wow. I love the tassel. Such a great job again Kyle.
ReplyDeleteThank you Summer Flies! I love red patent leather too! Tassels are so easy to make--give it a try sometime!
DeleteAwesome bag!!! That red is such a great colour to brighten up a winters day.
ReplyDeleteThank you Sew, Jean Margaret! I love how bright and cheery the red is!
DeleteYou are a one-woman bag making factory! That is one fab bag!
ReplyDeleteThanks Lisa! I'm really into making the bags!!
DeleteWow this bag is a stunner and it came together quickly. I agree those grey stones are a perfect backdrop, especially for bright colors like this vibrant red. Beautiful bag!
ReplyDeleteThanks Tomasa! I really felt like I got into the bag making rhythm! I've lived here for 12 years and always thought of those stones as the "gravel pit". Just this year have I discovered their beauty!
DeleteWow, you did a fabulous job; it looks like a designer bag.
ReplyDeleteThank you Anon! I am pleased with it and proud of it. :)
DeleteAnother winner! Your bag-making skills never cease to amaze. =)
ReplyDeleteThanks L!!! Honestly, I surprise myself!!
DeleteGorgeous handbag!
ReplyDeleteThanks Sheila!
DeleteBeautiful bag!
ReplyDeleteThanks Pencil Girl!
DeleteThis is an amazing bag & I love how detailed you are in instructions . Makes me think I could do this off your wonderful description!
ReplyDeleteReally nice job & I love the color .
Thanks MaryEllen! Sometimes I wonder if I write way too much, so I'm happy to hear that my posts are helpful. I love the color too!
DeleteWow, you did a fabulous job; it looks like a designer bag.
ReplyDeletegclub online
บาคาร่า online
goldenslot