Sunday, July 28, 2013

Butterick 4789: a teaser, plus PR class

A post in three parts:

Butterick 4789
I finished B4789 tonight and plan to wear it to work tmw.  I am *so* excited to have a new dress.  Haven't had a new dress since, what, March?

Here it is on Izzy this morning.  At this point everything was done except for the swayback tuck, which I did tonight.
B4789 almost done!
And here it is on me, this morning:
B4789 almost done!
I made a muslin of this dress and it was *entirely worth it*. I made a boatload of changes based on my muslin, which I will detail in another post.  Boatload of changes. Maybe I'll break the changes into separate posts.  That many changes.

Joann's 70% off notions sale
This was the sale I've been waiting for. It was one-day, in-store only, 70% off the entire notions wall, with coupon. I've been waiting for those pattern weights to go on sale as they are $13.99 regular price. I only had one set of 4 and I love them, but 4 is not enough.
joann's 70% off notions sale
Believe me, if they had the weights all in pink, you would be seeing all pink weights.  Such a happy color.
pattern weights
The thread snip was recommended in Janet Pray's Craftsy class. $6 on sale.
The bobbin box was an impulse purchase, to keep my Brother bobbins separate from my Baby Lock ones.  Hrm. Now I'm not sure about buying that.
I got square snaps, and button cover kits, and a loop turner, not pictured.  Square snaps, can you believe?  Be still my beating heart.

PR class:  Understanding Knit Fabrics
So class hasn't been in session a week yet, but I'm already behind in my PR class.
Pattern Review Understanding Knit Fabrics class
The class comes with 20 knit swatch samples, and some other goodies. I decided to use paper tags to label them, one side with the swatch number and the other side with the number and knit fabric name. Then I can quiz myself, ha ha!
DSC02070
I have learned a lot already, but, like I said, I'm behind....

Princeton Farmers Mkt flowers for this week:  Hydrangeas!
hydrangea!
Honeybee in a male pumpkin flower.  Still waiting for a female flower.  Last year it wasn't til August.
Honeybee in the pumpkin flower!
Be well! Good night!

Sunday, July 21, 2013

Catching up...

So much to catch up on....
Bloglovin
So a few weeks late, but here goes:
Follow my blog with Bloglovin
Honestly, I never used Google Reader, just read blogs down the sidebar of my own blog...but it is pretty cool how bloglovin sends email with all of the posts y'all write, right in there...

Online classes
I finished watching all 3.5 hours of Sew Better, Sew Faster:  Garment Industry Techniques by Janet Pray, on Craftsy.  Wow.  There is a boatload of good stuff in there. Lots of fast and furious notetaking on my part.    Janet shows how to sew without pins or basting, and how to make a super-professional looking jacket.  I won't make the jacket anytime soon (though it would be awesome if I could make it in time to show her at the ASE).  My list of sewing tools to buy grows!  Highly recommend.  LOVE the notetaking feature.

I enrolled in Understanding Knit Fabrics on PR.  It starts Tuesday night but I already have received my kit and have been fondling the 20 knit fabric samples.  I am super-excited for this class.

My new calling cards.
I was running out of my old calling cards, and Moo was having a sale, so here are my new cards:


my new Moo cards (right).
Old Moo cards, left, new Moo cards, right.

I think I might like the old cards better but I like the color of the new cards, so...

Proof of actual sewing

Here is the muslin I started working on last weekend, sneak peek, another oops shot:
M4789 muslin
And here's one of those "looks like some kinda weird instagram photo" but it's not, maybe my camera is starting to die.
M4789 muslin
Anyway, that was just the muslin and it had some fitting issues, especially in the back, that I 'fixed'.

So then I started cutting it out of this purple lusciousness (I'm skipping over a whole lot of fabric related drama):
Pinned to Izzy but oops
Pinned to Izzy

and was feeling all proud of myself for cutting knits single layer....and then realized when I cut the 3rd piece , I had not followed the cutting diagram (which I did follow when I cut the first two pieces, I don't know why I forged ahead with the 3rd piece without consulting the cutting diagram again) and didn't have enough fabric left to cut the 4th piece.   ARGH!   Cue fabric related meltdown (ok, that's a bit of an overstatement.  But it was definitely time for dinner by that point).

For a dress pattern that has  all of 2 pieces (really, 2 pieces), I have already invested about 8 hours in the muslin, cutting the underlining to underline some very special yet incredibly see-through fabric, making a sample of fabric + underlining, then ditching that plan (special fabric and underlining) entirely because I couldn't handle the amount of chevron matching that would be involved, and then cutting into my new "real" fabric to this, um, point.

So I wrote three pattern reviews tonight, so I'm all caught up on that, yay!

Here are my pumpkin vines:

my pumpkin vines, 7/21/13
Green eyed susans from the Princeton Farmers Market (with decorative grass):
green eyed susans from Princeton Farmers Market
And my black eyed susans that came back:
DSC01980
And cookies I made last weekend:
cookies from scratch!!  yum!!
Be well!!

Friday, July 5, 2013

New Look 6095 view E: Cat Bag DONE!

Where do I begin?
New Look  view E: cat bag done!
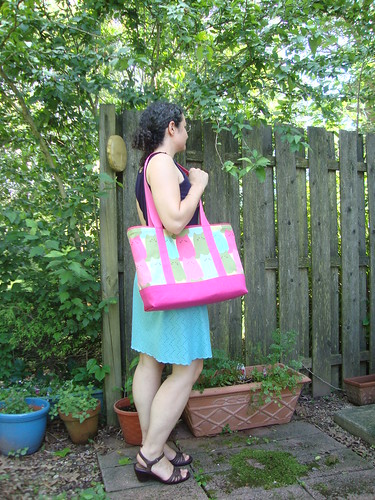
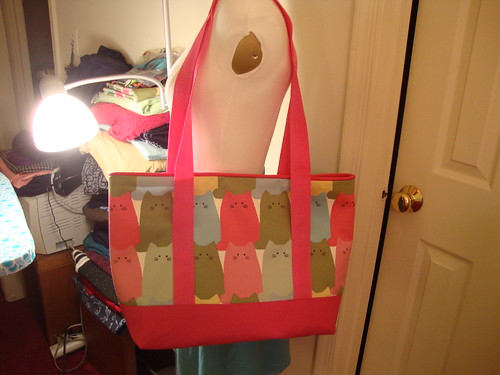
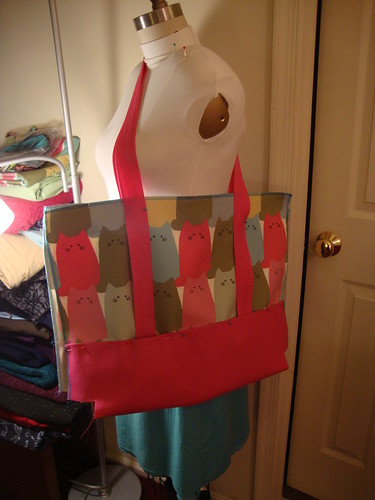
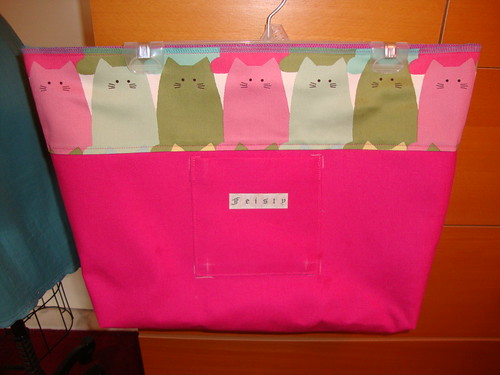
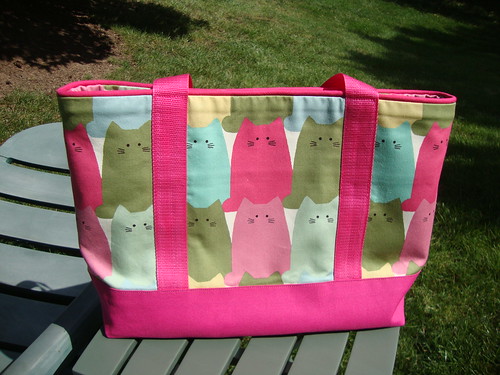
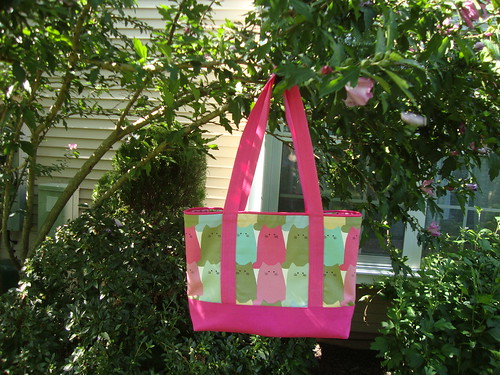
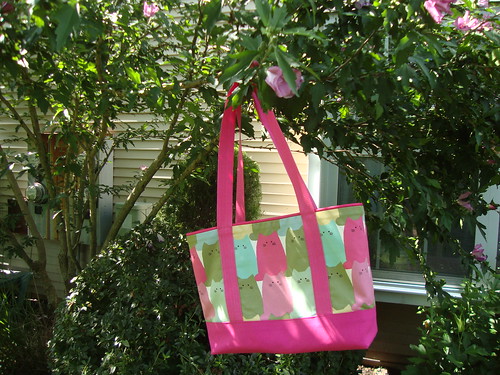
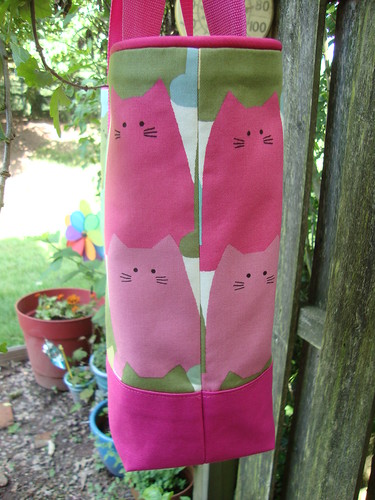
The cat bag is done!!
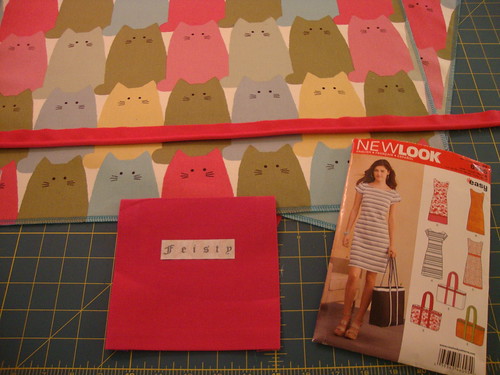
New Look  view E: cat bag done!

The pattern 

I originally bought this pattern for the dress, but the bag started to intrigue me. I looked it up on PR and most of the reviews were for the dress, there was one for the bag which got me all excited for sewing this up. (It's made with bicycle fabric--velosewer, you should check it out).
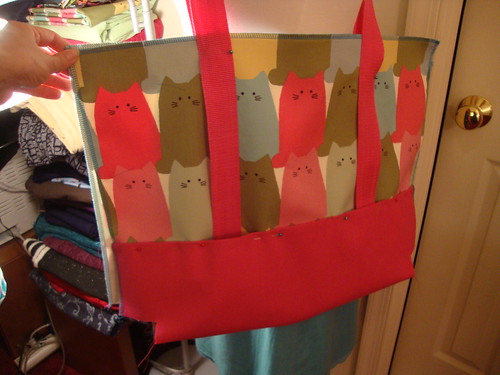
The cat fabric 

I originally saw this fabric at Kaimuiki during my day with MushyWear.   It's Japanese fabric from Kobayashi, from their Quiet Cats line (I guess they are quite because they have no mouths)

I bought .75 yards of it to make my mom an apron. But when it finally arrived off the Pineapple Express, I had to have some for me. And for correct kitty placement I could not use the .75 yards I bought. I googled for it and found it on this website that sells so much cute stuff.  It comes in three colorways, and I bought the green/pink colorway.   I bought, um,  a few yards (this is not the last time you will see this fabric...)
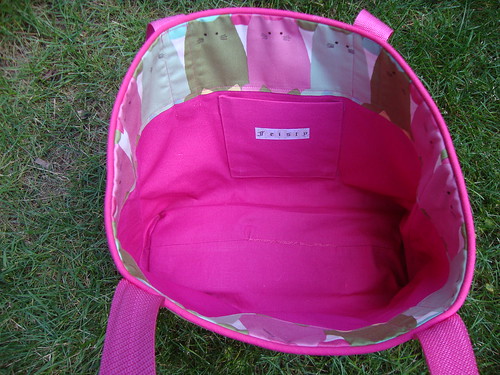
The hot pink canvas
So last Friday I had this brilliant idea to have a hot pink bottom on the bag to match the hot pink webbing and hot pink cat, but had no hot pink canvas in stash.  Last Saturday night I ventured to the Joann's in Lawrenceville where my hot pink canvas dreams were fulfilled.  I bought .75 yards of it and used it for the lining, a pocket, and the exterior bottom of the bag.  If I had bought more (or maybe more carefully laid out the pattern pieces) I might not have needed to sew a center seam in the bottom. 
New Look  view E: cat bag in progress.  Edgestitching foot in action.

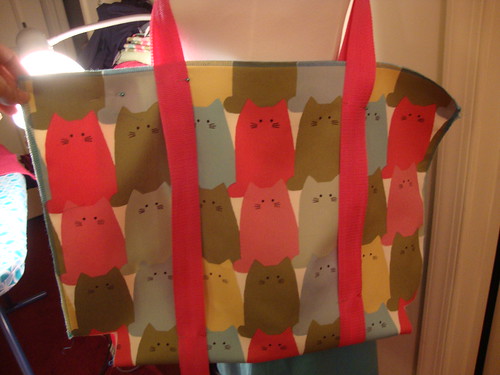
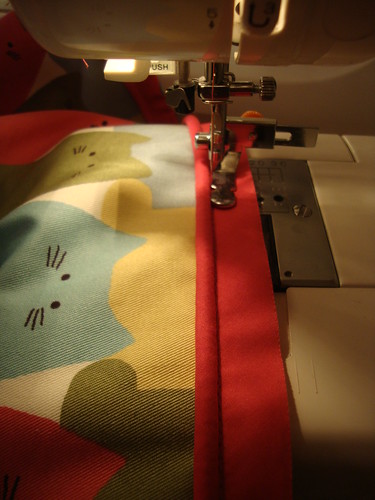
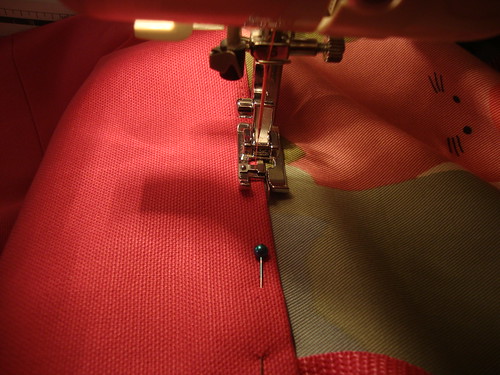
The edgestitching foot in action
The hot pink webbing and thread
When I was in NY with velosewer, I happened to find this hot pink webbing at Pacific Trimming.  I had not thought about getting hot pink webbing for the cat but I was pretty sure it would match the hot pink cat on the fabric.  I bought 4 yards and it turned out the pattern called for 3.5 yards.
New Look  view E: cat bag in progress!  Edgestitching foot in action.

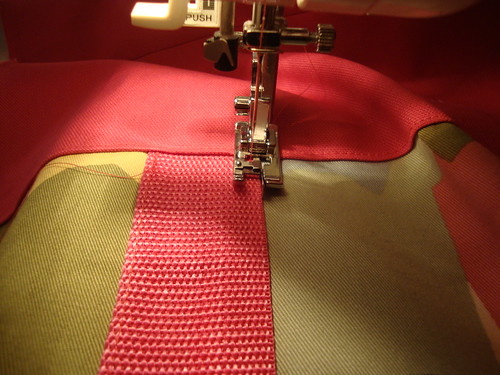
My edgestitching foot got a workout!

The thread I used was Coats and Clark color 1840 (which actually is named hot pink), which blends perfectly into the webbing.

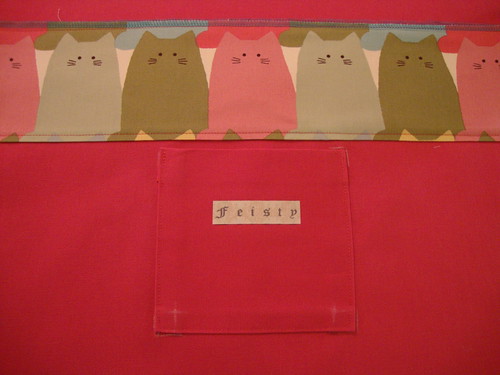
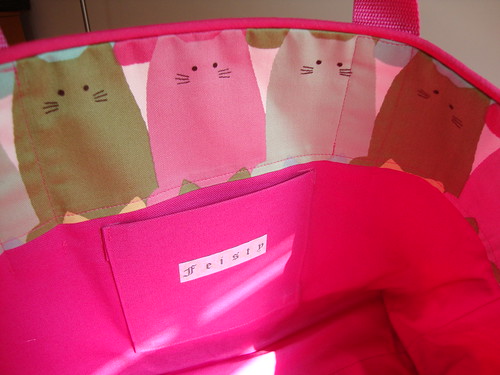
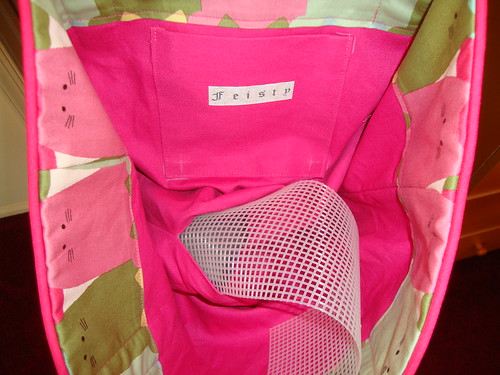
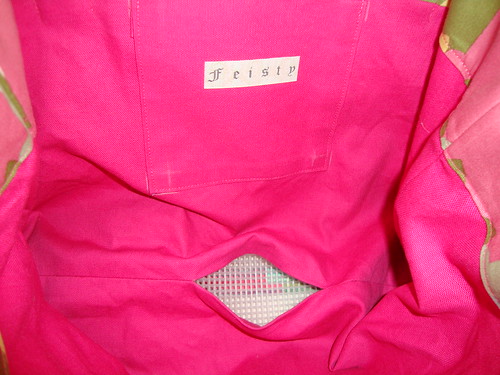
The pocket and the label and the cats on the inside
I added an interior pocket and used the "feisty" label that was part of the goodie bag from PR weekend Philly 2010.  I would *love* to have more labels like that--any idea on where I can find predone labels with random words on them?

Also I added cats to the top of the lining, just because I like this kind of detail.  It's on all the Simplicity bags I've sewn.
New Look  view E: cat bag in progress.
The interfacing
I fused Pam's interfacing to the cat fabric, which gave it a really nice feel and drape.  I just love Pam's interfacing. Yes, it's not as cheap as Joann's (money wise) but the quality is SO much better, plus it comes in wide widths, does not shrink and does not bubble. 
New Look 6095:  the feisty pocket
The plastic canvas
The pattern called for cardboard in the bottom of the bag and recommended covering it in a scrap of lining fabric.  From somewhere in my crafty past, I recalled using plastic canvas for things like this (canvas like the kind for needleworking with yarn, whatever that is called, I really can't remember).
So at Joann's I picked up some of these big sheets of plastic canvas.
New Look  view E: cat bag in progress.
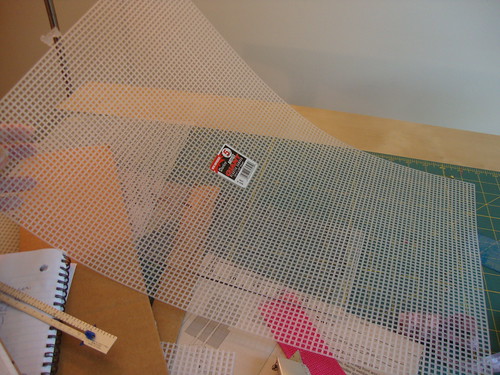
I cut it to the recommended size of the cardboard, and I actually cut two of them, and put them inside the lining.  That way the bag is still washable and the plastic canvas is contained inside the lining.  I think I will use that technique on all of my bags from now on!  It really helps the bottom of the bag
New Look  view E: cat bag in progress.
The serging
My serger was still threaded with turquoise thread from the skirt, so I went with it and used it for serging almost all raw edges.

The piping
I made my own piping using a length of broadcloth from the Rag Shop, of all places. The sticker was still on it, dated 6/14/06, $2.29 a yard.  I have no idea why I bought it 7 years ago, but it came in handy this week!  I used thick red cording that was in my stash.  The piping tutorial I like the best is this one from the Seasoned Homemaker
New Look  view E: cat bag in progress!  ipper foot in action
If I had to do it again
I would sew the handles on to the front of the bag, almost all the way up to the top.  The way the directions have you do it, you sew the webbing up to 5" away from the top, then put the lining in, then sew the webbing up the rest of the way, but it is kind of awkward to do so, and I'm not sure what the benefit is of having the webbing sewn through the lining 5" to the top of the bag.

The order I would sew this in is:
  1. bottom seam (if your fabric is one-way directional like mine is--the pattern piece is actually one big piece that I folded in half and cut two pieces of because my cats all face one direction)
  2. sew the webbing on to exterior fabric about an inch from the top
  3. sew the canvas on the bottom and edgestitch
  4. sew side seams
  5. sew bottom corners
  6. sew piping into the bag
  7. sew pocket  and iron label onto lining
  8. sew cat facing to lining
  9. sew lining together
  10. sew lining to the exterior fabric as per the directions.
  11. insert plastic canvas through opening
  12. stitch opening
  13. sew remaining 1" of webbing to the top of the bag.
New Look  view E: cat bag.
Rejoice!
New Look  view E: cat bag done!
Can I find what I'm looking for?
New Look  view E: cat bag done!
It was a little breezy:
New Look  view E: cat bag done!
New Look 6095:  peeking inside
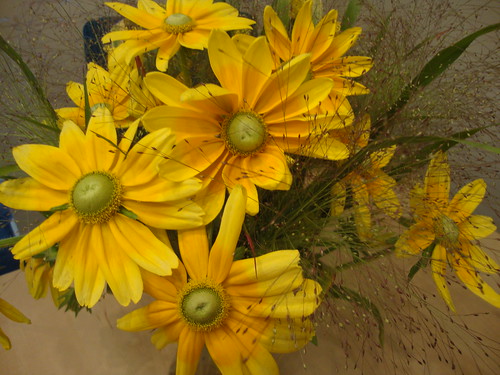
Hey, the black eyed susans are back!
New Look  view E: cat bag done!
Be well!!

Thursday, July 4, 2013

New Look 6095: I committed to the pink canvas bottom

Thank you for your comments on my last post.
There were 9 votes pro-pink bottom and 2 votes to not cover up the kitties. 

I committed to the pink canvas bottom.
NL6095 further along....
lsaspacey, in the previous post, the corners were not sewn, so I think it made the pink look longer than it actually is.  This is a better proportion, isn't it, now that the corners are sewn
NL6095 further along....

The webbing is only sewn half way up the bag; it will be completely sewn after the lining is inserted (and thus have a straight line across).

I think I might finish it tmw during my glorious 4 day weekend chez moi.  (I have now taken to copying and pasting ?'s and z's where needed).

Be well!!

Tuesday, July 2, 2013

NL6095 in progress: with or without pink canvas bottom

I'm working on my version of NL 6095, the bag:
made mah own piping!

I made my own pink piping!
Plus, 10 bonus points if you know where that "feisty" iron on label is from...

Here is a mockup with the bag with a pink canvas bottom:
NL6095 mockup: with pink bottom:
The pink canvas and the straps are just pinned on:
NL6095 mockup: with pink bottom:
And here it is, without the pink bottom:
NL6095 mockup: without pink bottom:
Which do you prefer(Question Mark)

The question mark key (hereafter referred to as QM) on my keyboard is currently non-functional, as is the last letter of the alphabet key.  Oh, and the regular arrows aren't working either.  Ha ha!)

With the pink canvas bottom or without the pink canvas bottom (QM)

Here's an idea of where the inside is going:
interior pocket:  feisty!
Tell me what you think! (and don't worry, there will be outdoor pix when this is finished!  I'm loving the outdoor pix too!)
Be well!