Thursday, October 29, 2015

Batgirl Birthday Costume Simplicity 1036

20151025_135326
Hey!!!
20151025_140700
Today is my birthday!  And my 40th one at that!   Yay!
20151025_140437
When the gym announced that they would be celebrating Halloween 2 days early, on my birthday, I started thinking about birthday costumes.
20151025_140001
First I wanted to be Catwoman, i.e. the 1960's Catwoman (think Eartha Kitt and Julie Newmar).   Seemed simple enough: form fitting black shirt and black workout pants, cat ears that I probably have in the closet from a past Halloween outfit, a wide gold belt worn at the hip and a gold chain or two around my neck.  Maybe buy black gloves and hot glue some gold fake nails for extra credit.
20151028_204344
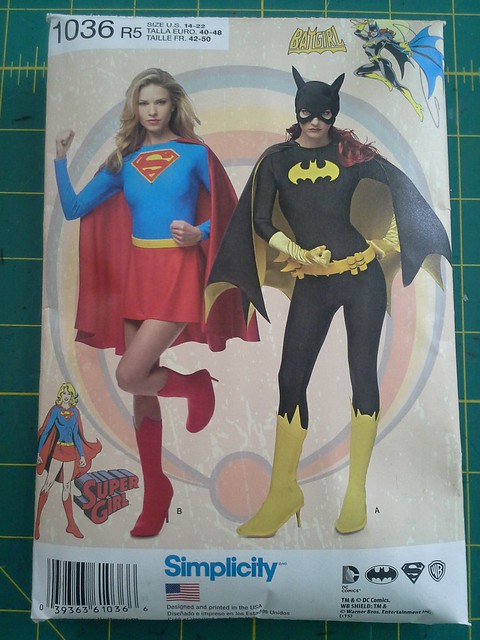
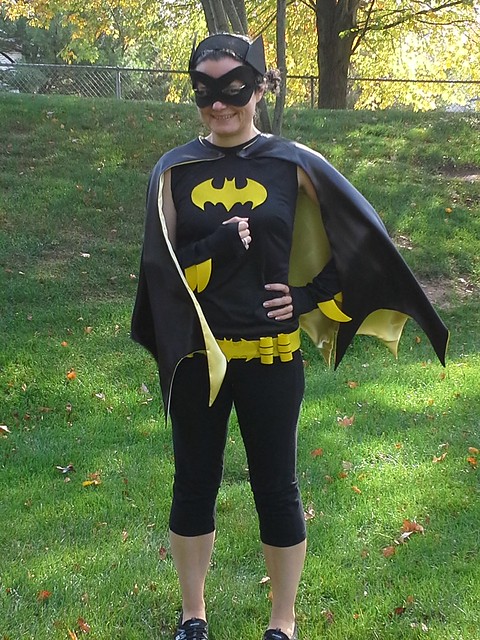
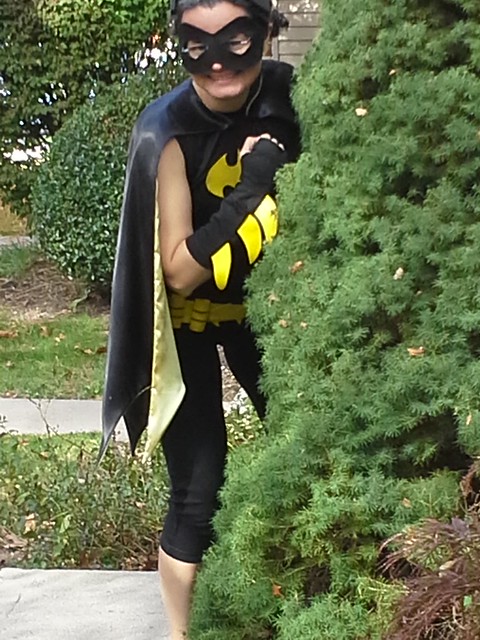
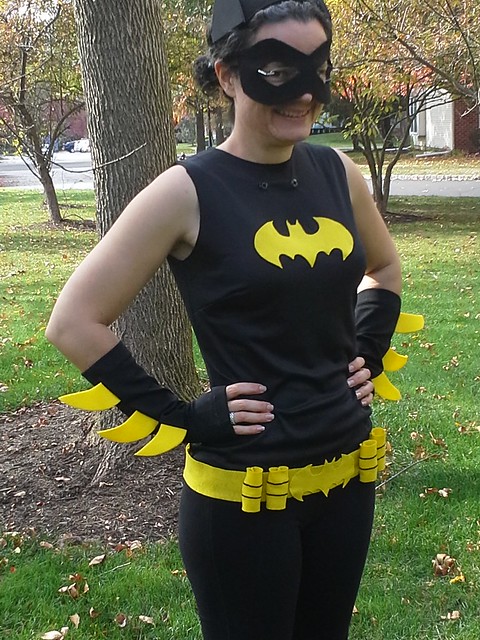
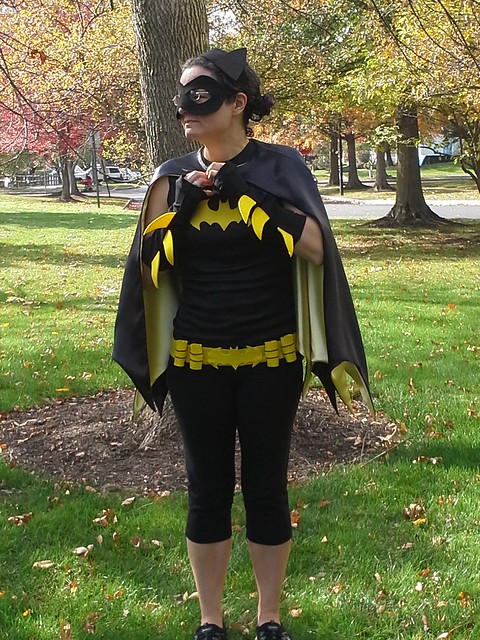
But then I saw Simplicity 1036, Batgirl View A and I had.to.have.that.cape!!!!  Yes, I actually ventured into Joann's during the month of October to buy the pattern and the materials for this outfit.

Also I want to mention that it is really cool that Simplicity has the official licenses for these costumes, because it means it's the pattern for the real bat symbol and not some fake bat symbol.  :)
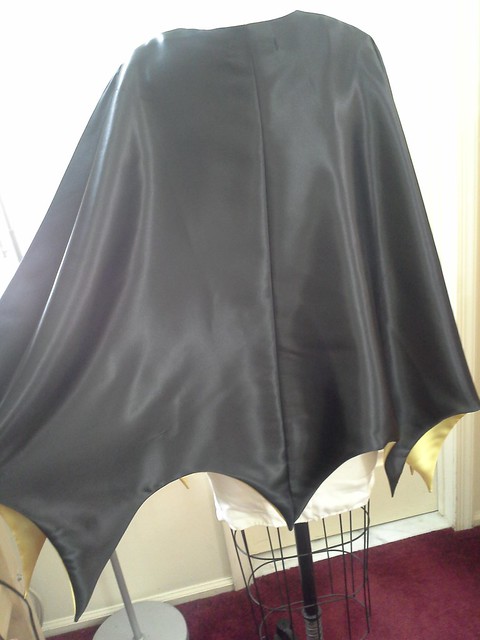
20151028_204901
The cape

this one
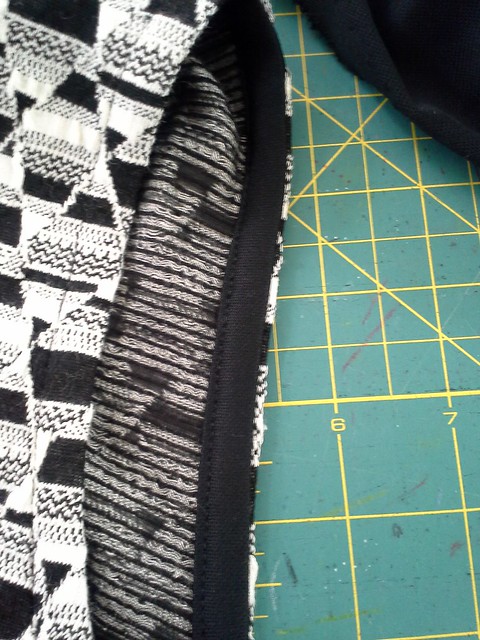
I purchased the black satin and yellow costume satin at Joann's.  This satin is more of the "Snow White" or "Robin cape" color yellow and not Batman yellow, but I am trying to give up my perfectionistic tendencies and decided that no one at the gym will say it's a real shame that the yellow satin does not match the yellow accessories.
20151010_165925
Falling off the edge of the table

20151011_112920
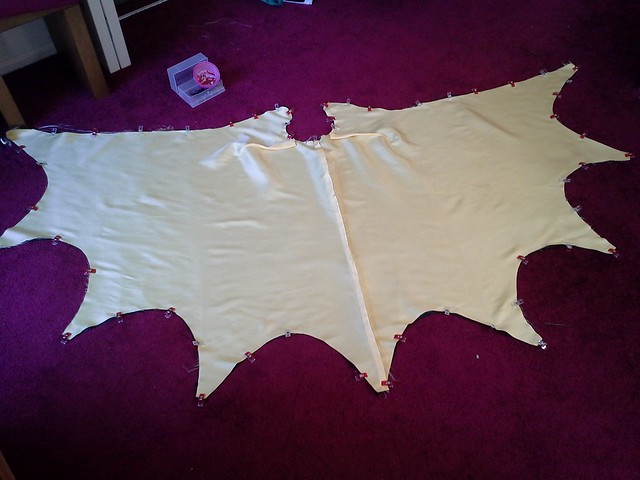
In progress, when I wonder clipped the lining to the cape exterior
20151028_204808
Real cape--real shoulder darts!
20151028_204751

Notable cape points:

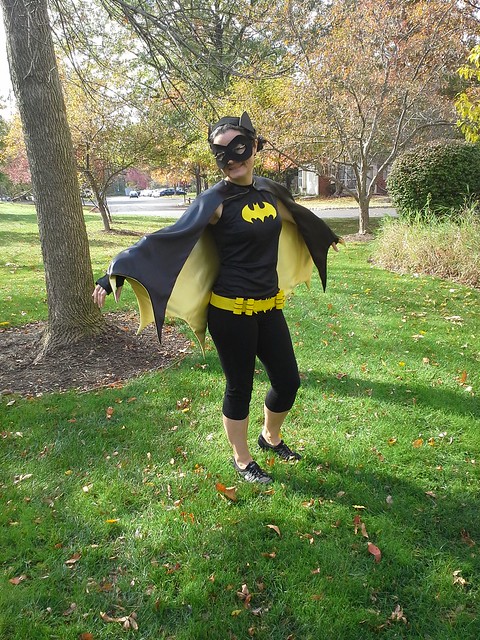
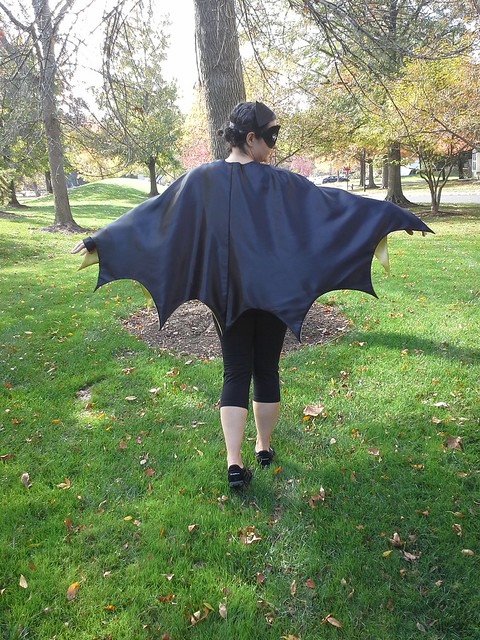
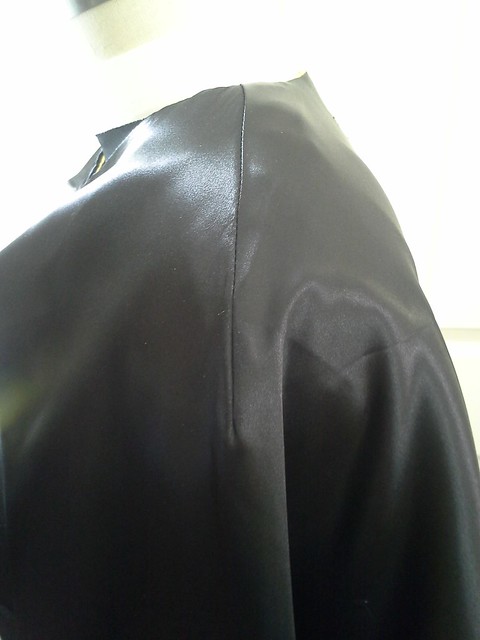
  • The cape is a real cape!  It has a shoulder seam so that the cape actually sits on the shoulder and snaps to the front of the shirt.   That is so much better (albeit more time consuming) than a rectangle of fabric velcroed on the back!
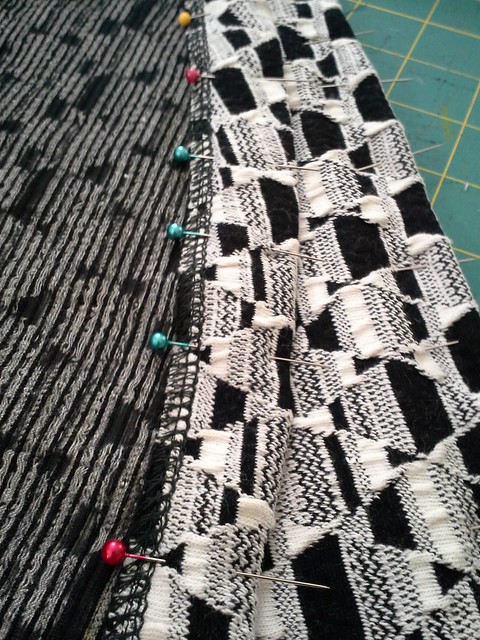
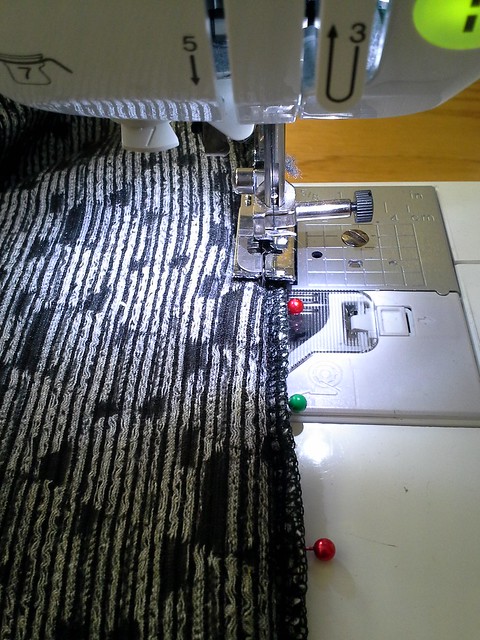
  • It is fully lined.
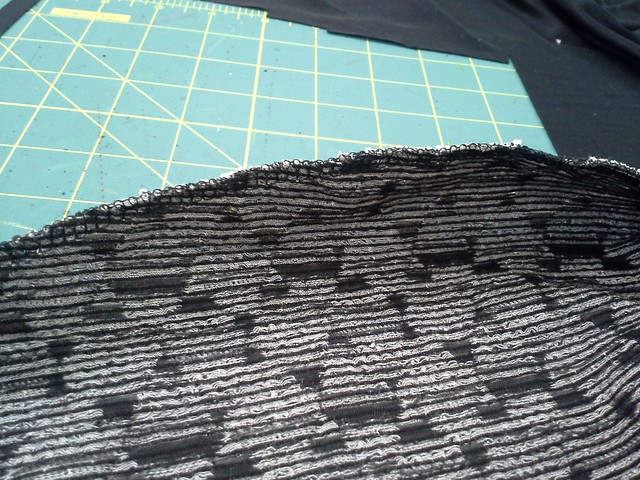
  • The cape piece was too large for my cutting table so I brought it downstairs to my dining room table where it was still too large!    
  • Also I never work with shifty fabrics so this satin was sliding around all over.
  • Also the fabric had major wrinkles so I used my Elna Press to press them out, but also wound up getting water marks on the yellow satin after using my spray bottle even though I had tested the technique on a scrap of satin first.  Oh well!
  • The bat points are really, truly defined which is awesome!!!  Though I wound up sewing with 3/4" seam allowances instead of 5/8" because I have a new sewing machine and it is different than my old one.
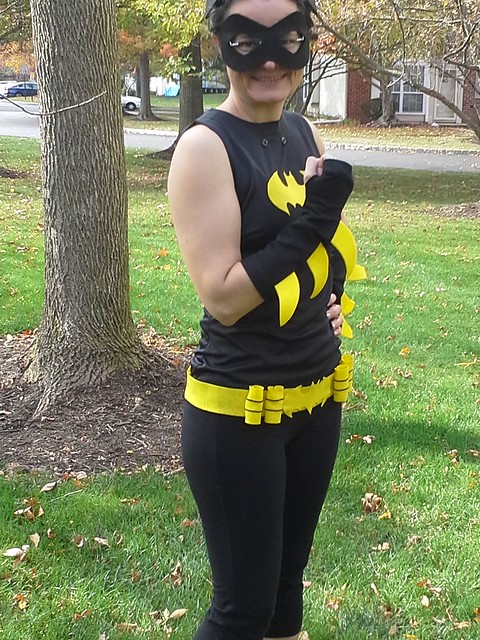
20151028_204830
The shirt
  • I did not use the shirt pattern exactly.  I muslined it but it wasn't what I was looking for so I used my TNT Simplicity 9776 tank pattern (which has darts) and overlaid it with the Batgirl shirt pattern to morph it into something resembling a shirt.  
  • The fabric is Nike Dri-Fit from SewSassy.com.  
  • I did not bind the armholes, neckline, nor hemmed it because it is just a costume!  
  • Also no sleeves, because I will work out in this and don't need extra fabric on my arms.
  • I cut the bat symbol from sticky yellow felt, and tacked it on to the front since it was not staying in place.
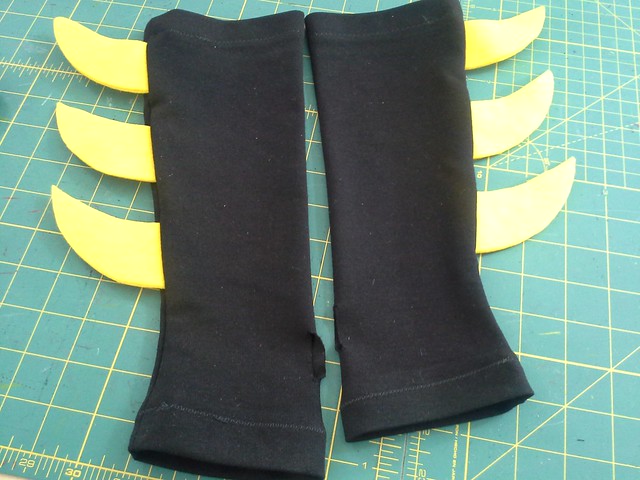
The gloves

20151025_135949
20151011_145700

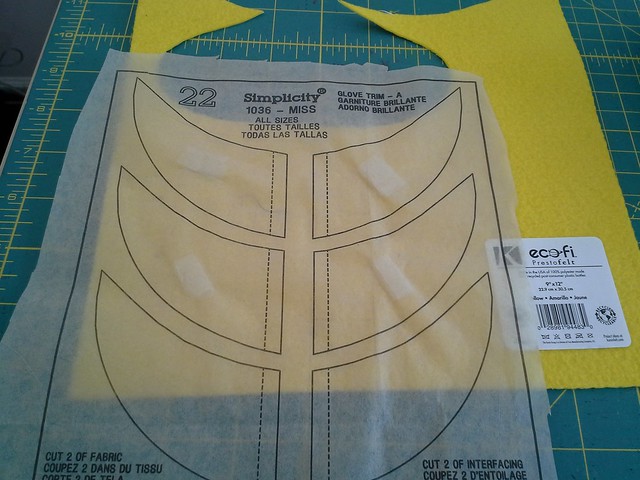
  • Ok, I LOLed when the directions said "You have purchased gloves."  You're supposed to unpick the side seam of the purchased gloves and insert the flanges.  
  • Instead, I used some black ponte-ish fabric to make fingerless gloves from the Burda 7287 pattern.  
  • The "glove trims" are cut from two layers of yellow felt.  I had no idea that advances had been made in felt, so I bought felt that already has sticky glue on one side, and adhered it to another piece of felt without sticky glue.
  • I sewed the glove trims into the side seam of the gloves.
  • I did have to rotate the gloves by 180 degrees to get the seam to be on the outside, then cut a hole for my thumb.  
  • By using fingerless gloves, this will make my workout a little less hot.
  • Somehow one is longer than the other, but I am trying to give up perfectionistic tendencies and it is a costume.
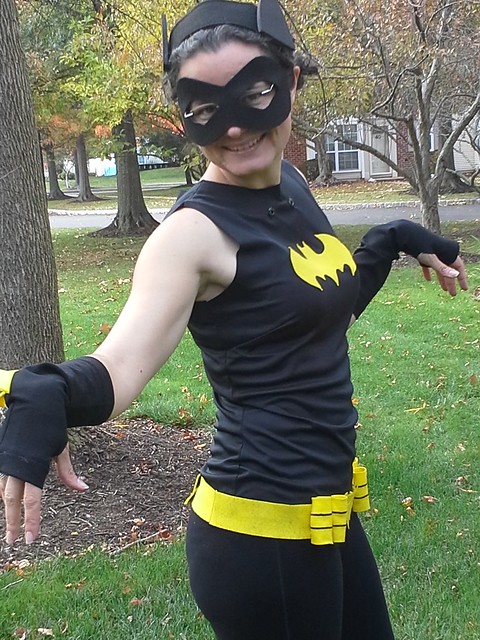
20151028_205023
This one
The Utility Belt

20151028_204727
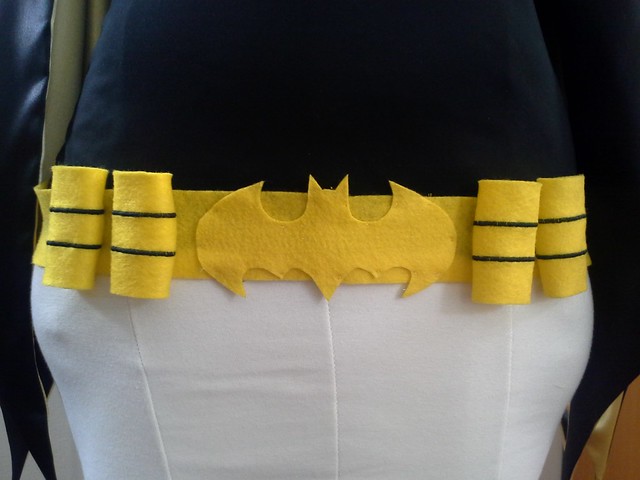
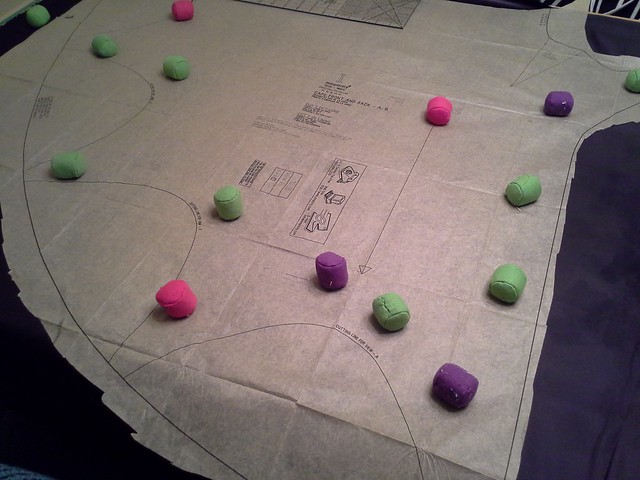
  • The utility belt was cut using the pattern, but eliminating the seam allowances.  This means it's 2" wide
  • as I did not have a continuous piece of felt (I had only purchased the felt rectangles), the belt is actually 4 lengths of felt sewn together to make a "continuous" pieced strip.
  • The bat symbol was cut from the felt with the sticky glue on the back, then tacked on in key places.
  • I made the "belt capsules" as per the directions; though they are not interfaced, I did faithfully zig zag the black "rings" onto the capsules.
  • I hand sewed the capsules on to the utility belt
  • I wish I had interfaced the capsules and pressed it because they do tend to get squished, but again, time to release some perfectionistic tendencies!!
  • The closure is black velcro, sewn on with yellow thread in the bobbin.  Originally black thread was in the bobbin but that showed on the outside and I couldn't let that one go....so I ripped it out and redid it.
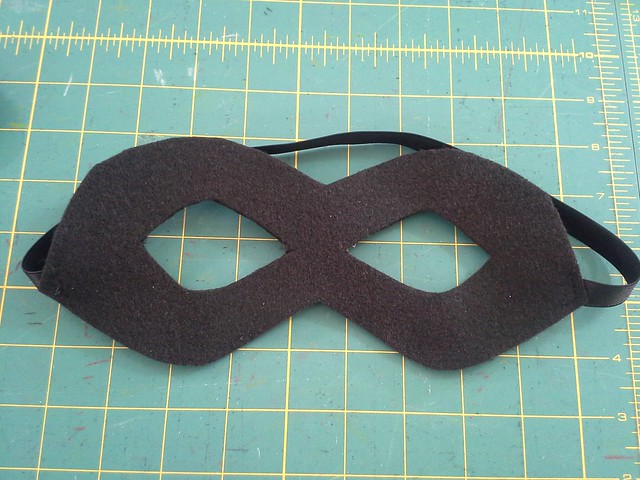
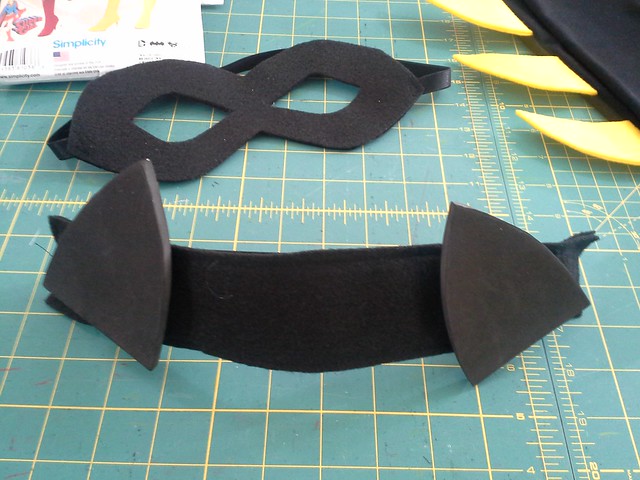
The mask/bat ears

20151028_205041
20151025_130150
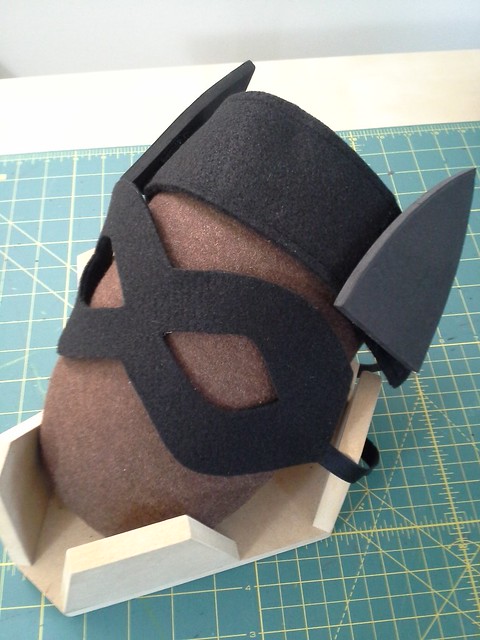
My ham models the face mask and ears
  • it's actually supposed to be a hood, but that would be too hot for working out
  • I cut the eye mask away from the rest of the face pattern
  • I cut it out of black sticky felt and adhered it to a layer of non-sticky felt
  • I used bra strapping to make the band, which is stitched in between the layers of felt

  • 20151028_205102
  • The ears are cut from black crafting foam, with the seam allowances cut away
  • I used a headband as a guide and cut a headband from 2 layers of black felt, stitched them together and used the bra strapping as the band.
  • The band has velcro sewn on
  • The ears have velcro hot glued on.  This way I can adjust the position of the ears
The pants
  • I decided to not re-invent the wheel and use my standard RTW workout pants instead of sewing ones from scratch.

The bootcovers

  • I'm not making the shoe covers as that would make this outfit too hot to workout in, but do you see the bat ears on the pattern?  Adorable!

20151025_140909
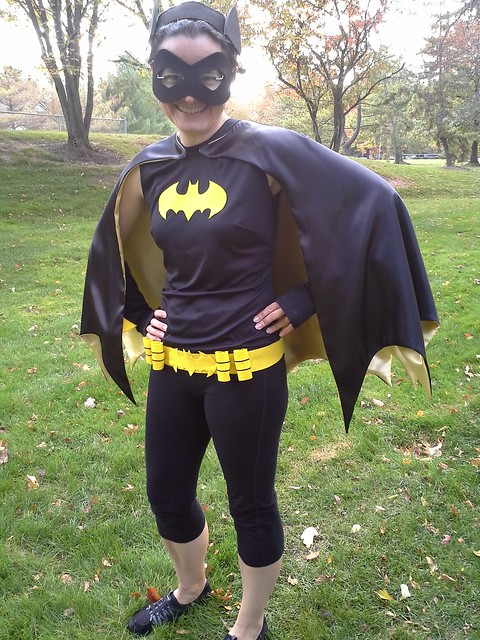
Overall I am quite pleased with this outfit and can't wait to wear it to class tonight!  I'm pretty sure I won't be able to do the whole class with the cape on, but maybe half of it??
20151025_140241
Be well!!


Wednesday, October 21, 2015

Handstitched Heidi Boyd Fox Whimsy Stitches Kit

20151021_192349
Soooo.....back on August 2, I was checking out at the City Quilter in NYC before sprinting to get the bus home, and saw this kit, all stitched up, on the wall.

As I was already forking over my credit card, I decided I would buy the kit online. I was disappointed to find that CQ didn't sell it online, and couldn't remember the name of the company. I did a google image search for fox embroidery kit to find it is by Heidi Boyd. There was free shipping that day on her etsy site, and when it arrived it was wrapped like a present, with a turquoise bow, felt flower and little fox pin, and even a handwritten note with a little fox drawn on the note. Sooooo cute.
20151021_192602
I stitched this up one afternoon during my week-long vacation waaaay back in early September, the day after I stitched up the Mollie Makes foxes.  Remember these cuties???
20150903_184132
Unlike the MM kit, this kit came with a high quality needle, yay!

It was awesome to be in my sewing room on a weekday afternoon, just stitching in a sunbeam.

20150904_141100
I had never done anything like this before, but it has some parallels to garment sewing:

  • Iron your fabric (the embroidery cloth)!  
  • Cut out your pattern pieces!  
  • Cut your fabric pieces (the felt)!

20150904_144655
Pop the fabric into the hoop, and start arranging the pieces.   Pin some of them on. bI was dying to use Wonder Tape, but I restrained myself.
20150904_151246
Start hand stitching.
20150904_160556
And stitching
20150904_170928
And then, a few (was it 4?) hours later, it's done!  I didn't give my fox whiskers; somehow I didn't like how they looked.  I added my initials and the year.
20150905_114703
I really liked the clever way to finish off the cloth.  The directions say to cut the fabric about an inch away from the hoop.  I went the extra mile and serged that part off (if you do that, take extra care around the metal part of the hoop, as far as its "interaction" with your metal presser foot!)
20150905_115956
Then I made a running stitch by hand to pull it together, as per the instructions.  How neat and tidy is that??  I cross stitched as a teenager and had no idea that's how you're supposed to finish the back!
20151021_192349
YAY!  I bought this kit again as I'd like to have a fox with me at work and a fox at home too.  Why not???  I may have bought a few other kits as well, uhmmmmm.....

Overall I enjoyed the slow, meditative stitching and the lack of fitting.  I did rip out here and there and started again, but that is par for the course for me.  And since I didn't know what I was doing, I really appreciated the clear instructions.    It is very straightforward.    Foxy!

IMG_20151021_163938
Here's a lineup of 5 of the 9 pumpkinettes I grew this year.  The printer ran out of ink....(silly joke I borrowed from the internet....you know, where they line up kittens...)

Be well!!!  (After having norovirus this weekend, I feel that takes on special significance!  Tonight was the first time I really felt like eating again, hurrah!)


Tuesday, October 13, 2015

A tote to make your eyes go funny

20150920_163114
"It makes my eyes go funny" --says quite a few people.
20150919_182352
I bought this fabric in August at Paron during ATP's visit to NYC.  It's Tom and Linda Platt fabric, and is reversible.  It has a really neat pattern to it.  Originally I thought I would make a skirt, but it's a bit much.  And I was thinking of making a bag for Anne's birthday. It was the weekend before the ASE, so it was then or never, if I was going to give her gift to her in person.  She had told me when she visited in August that one of her coworkers doesn't like all the prints Anne wears that "make her eyes go funny" so I was pretty sure Anne would like this tote.

20150919_172952
Initially I started folding the fabric in different ways, to find the right placement....this way....
20150919_173020
....that way....

but it was when I put the entire piece of fabric on the floor and photographed it that I saw that there were converging lines both horizontally and vertically which helped me decide on the placement.


20150921_104446
You can see the converging lines in vertically in the middle of the bag, and on the bottom.

20150921_104524
Yes, I did match my outfit to the bag for this photo shoot....it's a Vogue wrap dress and Jalie shrug.  I showed it to two of my coworkers who each said it made their eyes go funny...uhmmmmm....

20150920_164435
There is no bottom seam; I cut the fabric as one continuous piece so each side is symmetrical and I didn't need to worry about anything matching on the bottom.  There is peltex in the bottom to keep it stiff.
20150921_174836
This bag is made with reversible methods, so you can't tell where it was turned inside out.  I piped the top and topstitched in cream.  (Hint: the topstitching hides where it was turned inside out.)
20150920_164418
The lining is black duck cloth; the exterior fabric has medium weight Fashion Sewing Supply interfacing fused to it.
20150920_164240
The side seam somewhat matches.  Again I tugged-tugged-tugged to try to grain the fabric.  It's not bad but it could be better.
20150920_164116
Interior zipper pocket, with my label.
Fun fact: some of the cream from the pocket lining could be seen, so I used a black Sharpie marker (made for fabric) to cover up the cream.
20150920_164131
Fun pocket lining.
20150920_120954
Patch pocket on the other side.

20150927_093345
Anne and me at the ASE with her bag.  She loved it and used it all weekend long.  Yay!    Happy Birthday Anne!

I have enough of this fabric left to make myself a bag, and a zipper pouch or two...hmmmm....
IMG_20151004_172113
Pumpkinettes I grew this year. There would have been 10, but something (a deer?) ate one of them and several pumpkinette leaves.

Be well!

Sunday, October 4, 2015

Vogue 8944

20150916_091848
Do you read the McCall Pattern Company blog?  Last year they started doing videos of their new collections and posting them on their blog.  One of the women in the video was wearing this dress and I was instantly smitten.
20150916_091920
One of their blog commenters pointed out that it was also in their Fashion Fusion magazine, Fall/Winter 2014, on page 18.  Fashion Fusion combines Joann Fabrics with McCall patterns.  I have to give credit to Joann's; their fashion fabric is getting better.  No, it's not like going to the NYC Garment District, or downtown LA, but they are getting some better fabrics.
20151004_135801
It's a spongy knit with 25% crosswise stretch.

Here's the pattern envelope:
20151004_135744
I went by the finished pattern measurements and started with a 10 grading to 12; by the end it is probably a 10 all over. (The dress is supposed to be "very loose fitting" so it starts with a lot more ease, plus I was using a knit not woven fabric. I usually start with a 12 or 14).

I was totally intrigued by that above-bust seam.  It basically is taking the place of a dart.   I wanted to match the fabric print at that seam, so that it would be as invisible as possible.

I traced the pattern onto swedish tracing paper first, so that I would have full pattern pieces.  Have you used swedish tracing paper before?  An advantage is that you can sew on it and use it as a muslin!  Of course it is not stretchy like my fashion fabric, but I wanted to get a rough idea of where that seam was going to fall.  I basted that seam, the shoulder seams, and one side seam, then put it on (where the neckline promptly ripped--again, not stretchy--I just taped it back together again later) and used binder clips to hold it shut.

This gave me the idea to take 1/2" out of the top, to raise that seam up a bit.  I didn't want the seam to fall across my bust. I then removed the basting stitches from the tracing paper.
20151004_135913
When it came time to cut out the real fabric, I realized that the holes from the basting line gave me the perfect positioning of where I should place the pattern on the fabric.  I also had to tug on the fabric to grain it to get the lines in the fabric to be horizontal.
20151004_141334
The above picture was taken afterward, on a scrap, as a not-so-dramatic reenactment.
20151004_135712
If you stare at this picture long enough, you will see where the seam is.
20150914_214624
Instead of lining it as recommended, I bound the armholes and neckline with Nike Dri-Fit.  I love love love the effect.  Since the fabric turns out to be a little scratchy inside, I wear it with a full slip, and use a belt to nip it in at the waist.  Next time I make this dress, I might try lining it completely in Nike Dri Fit.
20150914_203111
The hem is very rounded and instructions for hems like this usually say something about basting that raw edge so you can gather it up to hem it.  A big tip (sorry, I don't remember where I learned this) is that if you crank up the DF on your serger to finish the raw edge, it will start to gather your fabric up (kind of like a fitted bed sheet corner) and naturally curl inward.  
20150914_203538
It worked like a charm.    Well, my first attempt I only brought the DF to 1.3 which wasn't enough to get the curl, so I went around again, over the existing serged edge, with the DF up to 1.5 and then it worked like a charm.  (I will note that it worked quite well on my serger (BabyLock Enlighten), but when I visited Lynn last week to show her this tip, it did not work on her serger at all, even when the DF on her serger was all the way up at 2.  Probably the tensions would have to be adjusted too on her serger to get this to work.)

20150914_205049
Then I press it with my Elna Press.
20150914_205629
Then I set it up for blind hemming.
20150914_210203
Then I blind hemmed it on my sewing machine with the stretch blind hemming stitch.    Usually I use a setting of -1 but I had to change it to -2 because this fabric is so thick and spongy.

20150916_092035
Overall I love this dress!  I like black and white combinations; I love this fit and flare style.  It does not wrinkle. My boss said that it looks expensive.  High praise!
20151002_164656
Flowers from the Princeton Farmers Market this week.

Be well!