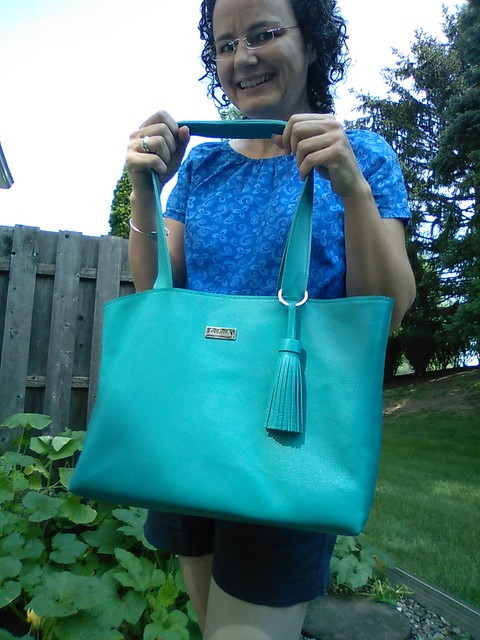
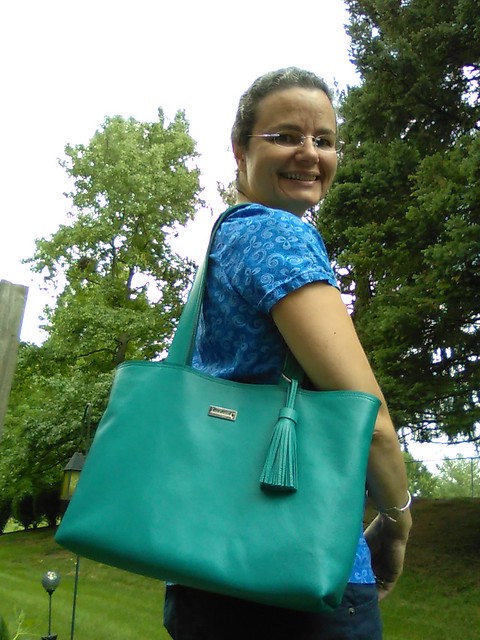
Hello from my vacation! When do you ever see me in shorts? Never! (And that is a Built By Wendy shirt I made like 8 years ago!) This was taken before I added the second row of topstitching, but I like this picture so here it is! Also those are my pumpkin vines in the background.
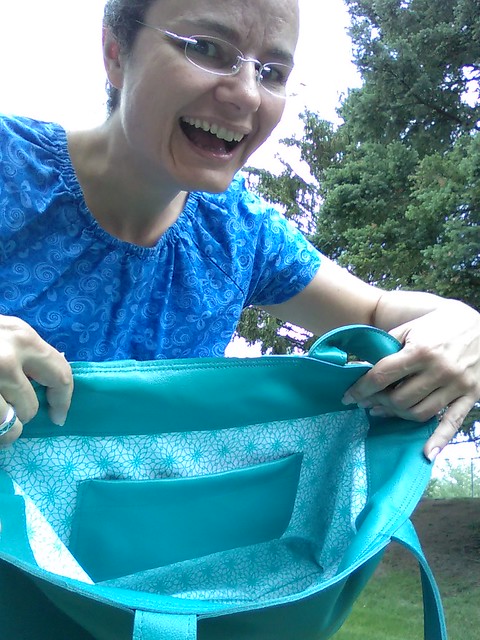
I'm smiling manically to get my camera, which takes a picture when it detects a smile, to take the picture! Here's the patch pocket for my phone. And it's got the double row of topstitching!
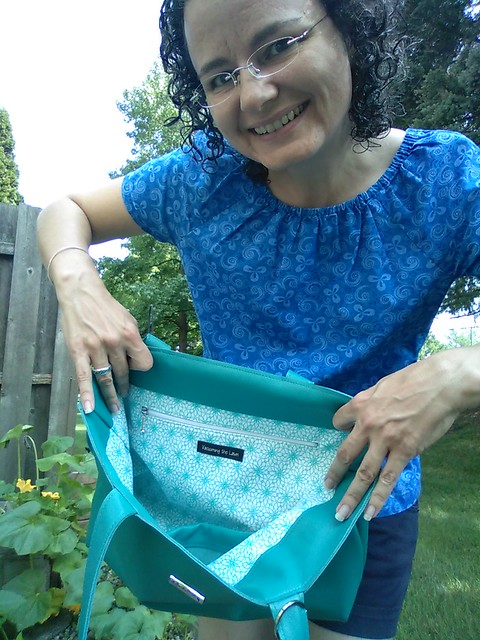
Interior pocket zipped up

Inside the zipper pocket, a fun surprise awaits! Double topstitched here too!
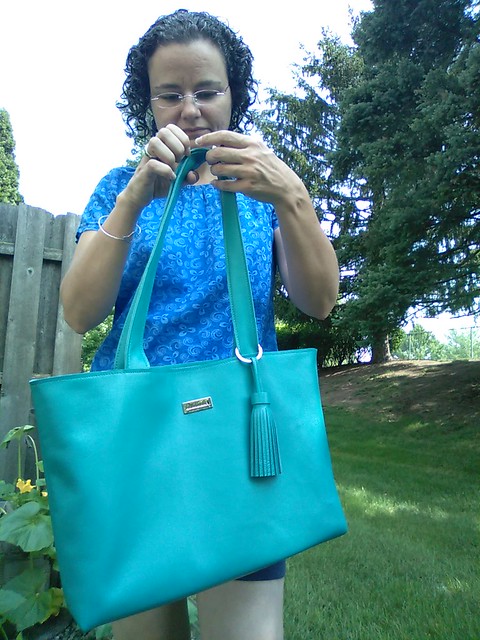
But I wasn't smiling!!
This vacation I decided to focus on making things I've never made before--like dabbling in quilting and working with leather. This post is about what I've learned with leather, because you know this blog is basically my "lab" notebook that I publicly share with you, and I don't want to forget what I've learned about leather this week!
(Also note that while I'm not blogging as much as I used to, I am on Instagram all the time; follow me here).
I've dabbled with the idea of making something with leather for a few years now.
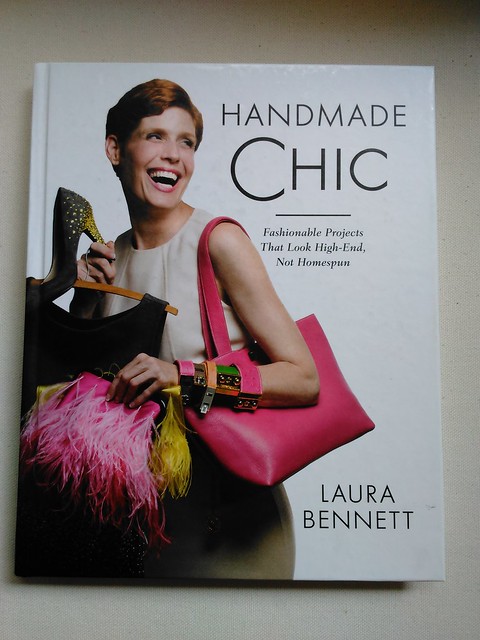
- A few years ago (2012?), I took Laura Bennett's "Handmade Chic" book out of the library. (Laura Bennett was on Project Runway season 3). I borrowed it again last summer and then finally bought the book. It has a heavy emphasis on leather and her methods seemed easy.
- I took a hands-on leather class with Kenneth King at the ASE in 2014 and recently found the handouts from the class.
- I took a seminar class on leather with a staff member from Haberman's Fabrics, also at the ASE. That might have been 2014. Found the handout from that as well.
- I watched and took copious notes (and I do mean pages of notes) from Don Morin's Making Leather Bags class on Craftsy. Don is a fountain of knowledge but I had to put him on double speed.
As with most sewing classes, there are contradictions in methods that instructors teach, and as usual it boils down to trying each method and using the method that works for you and your machine.
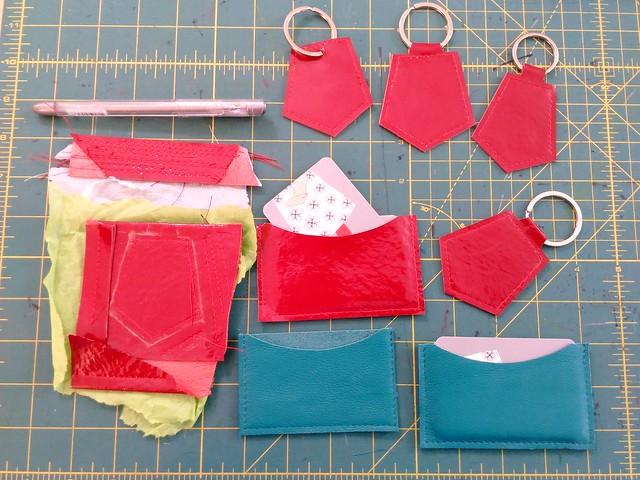
Earlier this year I got my feet wet by making two tassel keychains using the instructions from Bennett's book and a piece of leather from Kashi (Metro Textiles in NYC). On Monday, I decided to try the tab key chain and business card holder in red patent pig leather that I bought during PR weekend this year Fishman's Fabrics to gain some practice. On Thursday morning, I made the business card holder in this aqua-colored lamb leather, also from Fishman's Fabrics this year. Late Thursday afternoon, I cut out the pieces and started sewing!!!
Testing and Other Notes
- Use leather scraps to test stitch length and tension before stitching the real deal.
- I used regular polyester thread, coats and clark # 5570. I did not double up the thread
- I used my BabyLock Soprano, which is a pretty powerful home machine (well, compared to my Brother Project Runway machine).
- Whenever I refer to Wonder Tape below, it's the
CloverDritz kind and I also used the brayer that Morin recommends to really get the tape to stick.
Note about the bag
I wanted to make the pink bag that is on the book cover, but that is NOT the bag in the book! The pink bag inside the book is a taller and not-as-wide version of the bag on the front cover, and it doesn't have the bag bling!
Positioning of pattern pieces
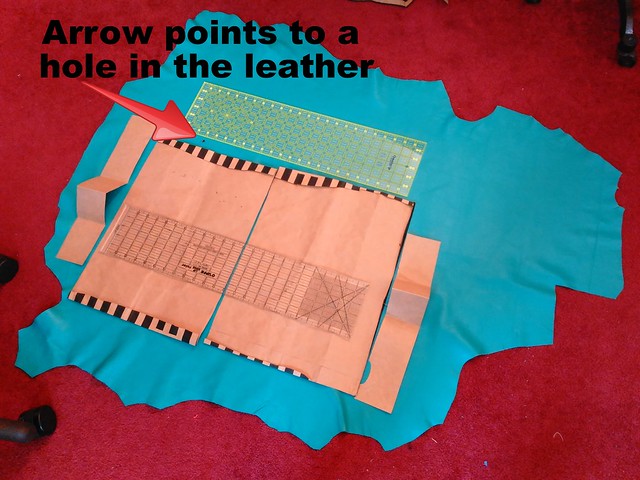
- My leather had a hole in it, so I worked around the hole.
- I cut pattern pieces out of a large paper shopping bag to figure out placement.
- The large ruler represents the straps (which I cut 3" longer than the ruler, see below)
- After making the bronze bag (which i haven't blogged yet), I cut the main bag pieces 18" long and 13.5" high. (This later was cut down to 13")
- The upper interior leather piece is 18" long and 3" high
- I also cut a patch leather pocket x by y
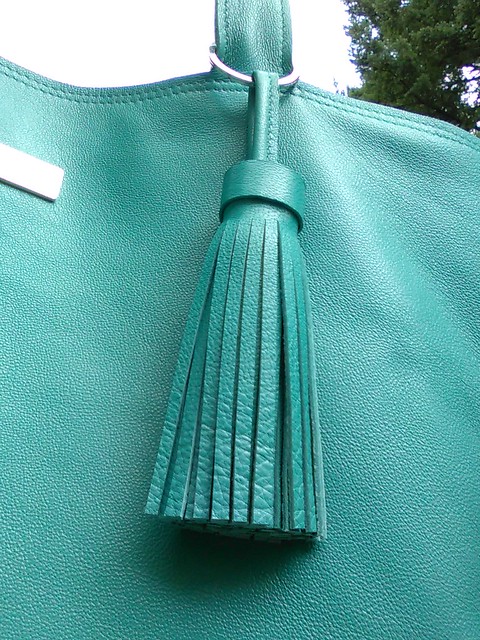
- And I decided to do a tassel for this too. I cut this 14" by 4" instead of the 13" by 3" the book recommends, to make a really substantial looking tassel.
- Cut out the leather using a new blade with my rotary cutter
- The interior fabric lining was 18" long and 11" high (but read more about that below)
Strapping:
- Bennett recommends 1" straps that are 22" long.
- From all my prior bagmaking, I know I prefer to cut 27" straps, and I cut them 1.5" wide
- I used Dritz Wonder Tape right on the edge to tape the straps to each other
- I used my walking foot and put a strip of tissue paper under the strap and against the feed dogs.
- In my tests, the size 16 brand new leather needle was fine but when I started sewing the straps, it skipped stitches :( . I used a size 18 brand new leather needle and it was fine--no skipped stitches!
- I could have done another row of stitching and then just cut the bad stitching off (then cut the other strap to the same size), but I didn't. So one strap has one row with some skipped stitches. Morin's class recommends hand stitching these skipped stitches, but I'm not sure I will.
- 7.0 needle position, 4.0 stitch length, 4.0 tension
- Aligned the edge of the walking foot with the edge of the leather.
- After stitching, I used a quilter's ruler that has 1/8" marked on it, aligned the stitching right under the green 1/8" line, and used my rotary cutter to cut away the excess. I put what I wanted to be the "right" side of the strapping down on my cutting table and cut from the wrong side.
- Be sure to use an even pass of the blade all the way to the end and beyond, pushing down a bit on the ruler to get a straight cut that doesn't veer off at the end.
The end result is straps that are 1.25" wide and 27" long. This may be a little too wide. Next time I might cut 1.25" wide straps to start, so that at the end they are 1" wide.

The exterior
- Used Dritz Wonder Tape to tape the front to the back, right sides together, right on the raw edge.
- I used my walking foot and put tissue paper under the leather
- Sewed front to the back
- 3.5 needle position, 4.0 stitch length, 4.0 tension
- In each corner, I removed a 2" x 2" square, then boxed out the corner and sewed it down. I sewed it again about 1/8" away.
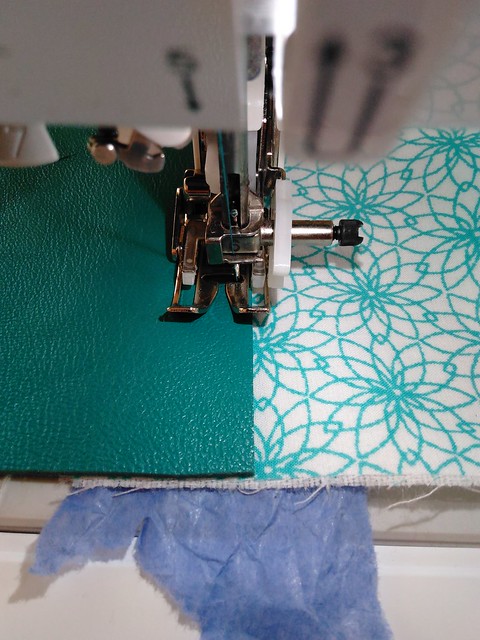
The lining
- Well I kind of had an internal debate over what lining to use, especially as I prefer light linings so I can easily see what is in my bag. So I took it to Instagram, and pdxsquared recommended orange, which I thought was a fabulous idea (HoJo's colors!), but the orange in my stash is like traffic cone orange, way too bright. In the end, I used this Lisette fabric I bought at Joann's in 2012, which has the same color aqua as the leather.
- Interfaced the lining with Fashion Sewing Supply medium weight iron-on interfacing.
- Drew a line 1" down from the top of the fabric lining, then aligned the raw edge of the leather lining piece to meet this line, using Dritz wonder tape to secure.
- Topstitched the leather down. Since I wanted the topstitching really close to the edge of the leather, I aligned the raw edge with the left edge of the white part of the walking foot.
Patch pocket
- Folded the top down by 1", used wonder tape to secure
- Topstitched this fold down
- Topstitched the pocket to the lining
Interior Zipper Pocket
- Used the tutorial I always use but used a 9" zipper and cut the pocket to be 13" instead of 12" long.
- The zipper is from Emmaline Bags
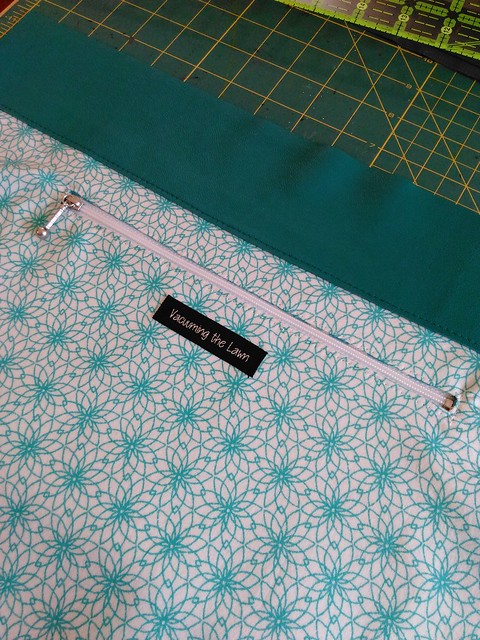
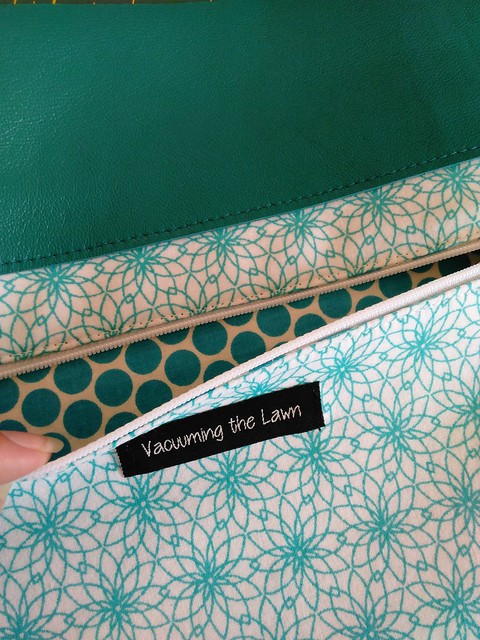
The pocket fabric was a remnant I bought at Joann's a while ago.
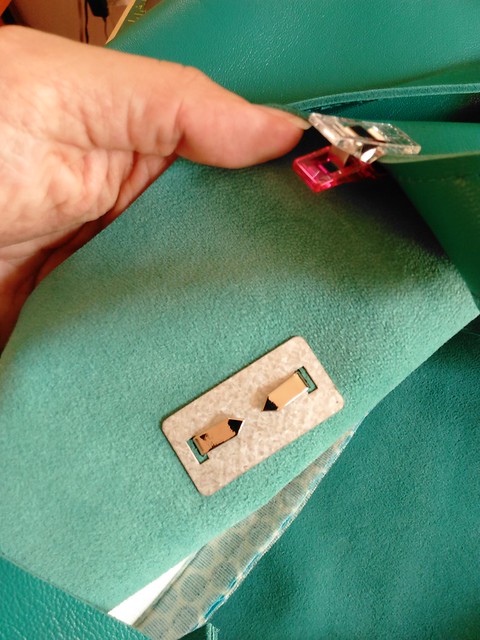
Bag bling
- This was my first time installing bag bling, in this case a metal tag that says "Handmade" and has a cute little bird, also from Emmaline Bags.
- It was super easy to install--use the plate to mark where to cut the slits, carefully cut the slits with a box cutter, then push the prongs through the slits, put the metal plate over the prongs and fold the prongs down
- Of course this part is a bit like cutting a welt pocket --mess it up badly and there isn't any going back!
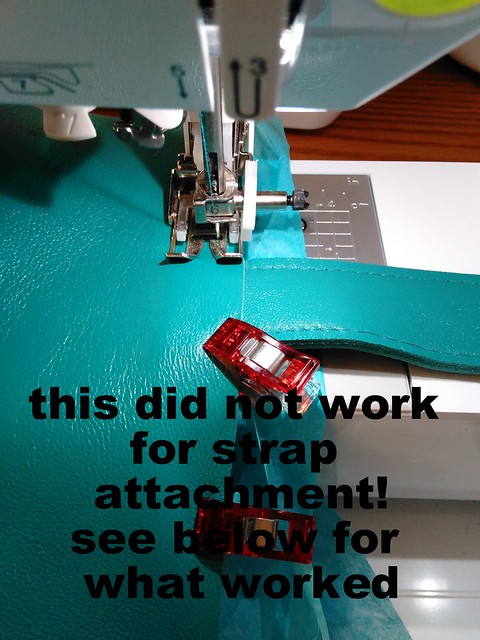
Sewing the lining and strapping to the exterior: take one (this did not work well for me but for completeness sake, here's what I did):
- Cut a strip of Peltex to fit the bottom of the bag to give it some structure. Put it in the bottom of the bag.
- Drew a line .75"from the short edge of each strap.
- aligned strap 4.5" from the side seams on the exterior
- Used wonder tape to secure
- Aligned raw edge of lining to raw edge of exterior and wonder clipped (not taped) in place. Foreshadowing: I should have wonder taped all the way around!
- Ran a few samples without skipped stitches and thought I was good to go
- 7.0 needle position, 4.0 stitch length, 4.0 tension
- Aligned edge of walking foot with raw edge
- Tissue paper under the foot
- Sadly, I got skipped stitches over the handles and at the bulky side seams, and the top just looked sloppy overall because it wasn't taped together beforehand.
At this point I had dinner and googled for help, and got this miracle blog post which stated that she uses her walking foot for most of the sewing but for strap attachment she uses her teflon foot, a brand new needle and a hump jumper
Sewing the lining and strapping to the exterior: take two (this worked as per the blog post!)
- Carefully removed the handles from the bag by removing the stitches in that area
- Cut off 1/2" all the way around the top of the bag through both layers to remove the bad topstitching (I did this in 4 cuts)
- Taped the handles back in place with wonder tape
- Taped the front to the back with wonder tape all the way around the top edge
- Used a brand new size 18 leather needle
- Used the teflon foot
- Put a piece of paper under the leather against the feed dogs
- Aligned raw edge of leather with edge of teflon foot
- 7.0 needle position, 4.0 stitch length, 4.4 tension this time
- Kind of gunned it over each strap instead of stitching slowly. I was thinking of it like driving my car...if it's a bit of a steep hill I gun it, right?
- Only used the hump jumper for the side seams (exterior seams taped to one side with wonder tape and interior seams taped to the opposite side)
- NO skipped stitches, YAY!
- As I was falling asleep that night, I wondered how the strapping would stay secure to the bag, as the only thing keeping it in place is that one row of topstitching and some wondertape. After conferring on IG, I stitched a second row this morning, 3.5 needle position, 4.0 stitch length and 4.4 tension, and it still looks good (no skipped stitches YAY!) and should be more secure.
Double row of stitches now!
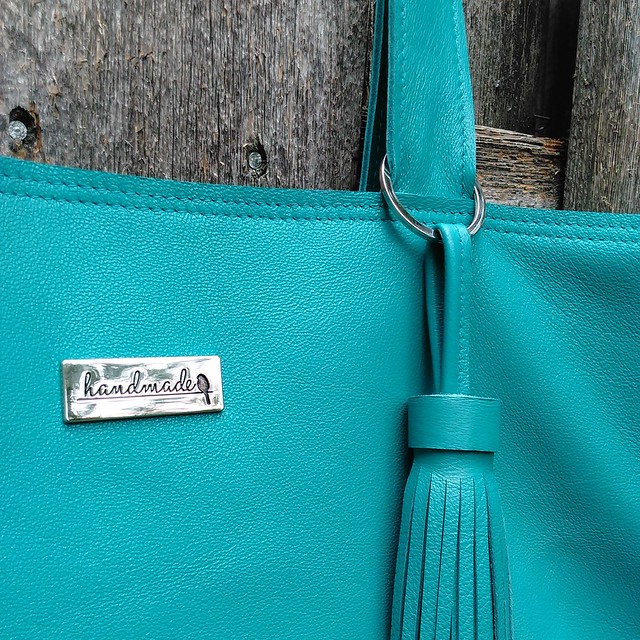
The tassel
- Making the tassel is super easy!!!
- Followed the directions in the book, but instead of winging the 1/8" cuts, I used the green 1/8" guide on a quilting ruler to make the cuts, squaring up every inch (if you read Bennett's book, what I wrote here will make sense)
- For the wrapping, I used 1/2" permanent Scotch double sided tape instead of the wonder tape since this part is not being stitched at all.
- The largest keyring I had in my stash was 1.25" and the strap is 1.25" so it squishes the bag strap a little bit. When I go to MPB Day, I will try to find a larger keyring at Pacific Trimming.
- I think this tassel, along with the "handmade" metal label, really makes the bag look professional.
A few notes about tab keyrings and business card holders...
- 3.5 stitch length is better to make it easier to hit the corner marks
- I used this silver leather marking pen I bought at SIL Thread in NYC to draw directly on the leather
- Followed that line as I stitched
- then wet a paper towel with cold water and wiped off the silver marking as soon as I was done stitching, and used a paper towel to dry.
- That worked on both the red patent leather and also the aqua leather.
- cut the excess off, being sure to use an even pass of the blade all the way to the end and beyond, pushing down a bit on the ruler, so as to make a really nice angle.
So now what???
- Bennett's book recommends sealing the raw edges with gum tragacanth or acrylic paint. I ordered some gum tragacanth on Amazon and am waiting for it to arrive. I will try it out first on the business card holder. She makes it sound super easy and I hope it is!
- This was actually my muslin for the bag I want to make out of the red patent leather, so that I could work out the kinks and learn how to sew with leather. Now I am feeling more confident. I could just make this bag again in the red patent, or I could make a different bag that I've had my eye on, but that one requires birthing the bag through an opening in the interior zipper pocket, and I'm afraid the patent leather will get lines in it that won't ever come out. Guess I will do a mini-test first and figure it out!!! (Or what about a red patent leather backpack...hmmmm!)
Be well!!